While good agronomic practices can maximize canola yields and returns throughout the growing season, proper harvest management is essential to realizing those yields. Seed and quality losses caused by untimely harvesting, inappropriate harvesting techniques, improper handling, or a combination of these practices, can all result in reduced crop yield, value or both. Therefore, timely harvest will help maximize yield, quality and returns.
Important tips for harvest management
- When considering harvest methods, assess each canola field to determine the suitability for swathing or direct combining. Both methods have a fit, and a combination of the two can help manage timing and efficiencies at harvest. Learn more in the Guide to Managing Canola Harvest.
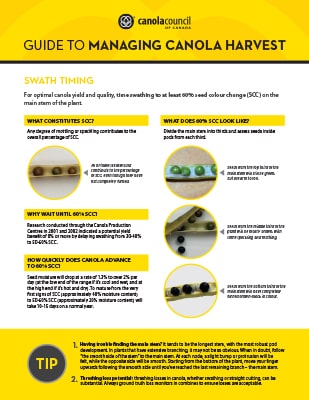
- Canola achieves optimum seed yield and quality when swathed at 60 per cent seed colour change (SCC), or later. If possible, swath when it’s cooler and moisture is present to slow the pace of curing.
- The percentage of SCC change at swathing usually has little effect on green seed levels, except under abnormal situations. In hot, dry weather (30 to 35 degrees Celsius) avoid swathing too early and assess crop frequently as seed colour change will happen more rapidly.
- Foliar pre-harvest aids are a management tool for straight cutting canola. Options include glyphosate, saflufenacil and diquat, the only true desiccant. When considering product options, always use the Keep it Clean Pre-Harvest Interval calculator, which is a tool to help achieve the Five simple tips to get your crops ready for export.

- After a frost, assess standing crop that morning. If damage is light, check again in the afternoon.
- Before combining, use a crush strip to determine the percentage of seeds that are green inside. No.1 Canada allows up to two per cent distinctly green seeds.
- Both auger and draper style headers can be used for direct combining. Differences in losses have been accounted for with various style headers and dividers, but the biggest predictor of losses at the header is the degree of shatter resistance in the canola cultivar (varietyA variety is a variant of a species that evolved in nature without the intervention of humans, e.g. Brassica oleracea variety (in short form, var.) botrytis (cauliflower), var. capitata (cabbage), var. italica (broccoli), etc. More).
- Use a drop pan to collect harvest losses from the combine and calibrate loss monitors, the harvest loss tool to calculate your losses and the combine optimization tool to figure out how to reduce your losses. Watch these short videos on how to reduce combine losses.
- Explore harvest-related research topics on the Canola Research Hub.
- For timely articles on canola harvest management, see Canola Watch.

For videos on canola harvest management and reducing losses, check out our YouTube playlist.
Swathing or direct combining/straight cutting
Both swathing and direct combining (or straight cutting) are effective ways to manage canola harvest. Each method has its own advantages and disadvantages. Some farms will use both methods to manage efficiencies and time at harvest.
After swathing, the crop may take five to 10 days or more to dry to uniform seed moisture content of eight to 10 per cent moisture. At this point, harvesting can begin if green seed levels are acceptable.
Advantages of swathing canola include:
- Potential for earlier harvest, which can be of particular importance in short season zones or for those intending to fall seed crops
- Potential for more uniform seed maturity
- Potential for a greater degree of biomass dry down and more uniform crop biomass dry down
- More flexibility and less critical timing of harvest. Canola will retain its quality in the swath better than other crops will.
- Potential for reduced shatter losses during the harvest operation
- Better dry down of green weed seeds and reduced high moisture dockage (can create volatility in storage) in the grain sample
Advantages of direct combining include:
- Potential for reduced labour requirements
- Reduced equipment requirements
- More flexibility in direction/area of field to be harvested
- Potential for increased seed size and yield
- Gained logistical efficiencies
Field evaluation for harvest
Carefully assess each canola field prior to 60 per cent seed colour change (SCC) to determine the suitability for swathing versus direct combining. This allows for appropriate swath timing in the event of a field being a poor candidate for direct combining. Canola can be direct combined with or without a desiccant or pre-harvest aid.
Factors to consider when deciding between direct combining and swathing include cultivar (varietyA variety is a variant of a species that evolved in nature without the intervention of humans, e.g. Brassica oleracea variety (in short form, var.) botrytis (cauliflower), var. capitata (cabbage), var. italica (broccoli), etc. More), crop canopy, crop uniformity, pod integrity, frost risk and plant stand 1.
- Cultivar: A shatter-resistant cultivar makes the rest of the decision-making process easier, as it tends to be the biggest factor with regards to losses. Other field, crop and management factors become more critical if a cultivar prone to shattering is direct combined. See information on (standard and pod shatter resistant) canola cultivar information at canolaperformancetrials.ca.
- Crop canopy: The crop should be well-knit. If a large proportion of the plants appear to move independently in the wind, they will be at higher risk for shattering loss as the plants senesce and dry down.
- Crop uniformity and field characteristics: Unevenly matured fields can be difficult to straight cut, particularly when the plant and stalk material does not dry down well. Field topography can play a large role in the evenness of maturation. Pre-harvest aids or swathing should be considered in the case of uneven maturation.
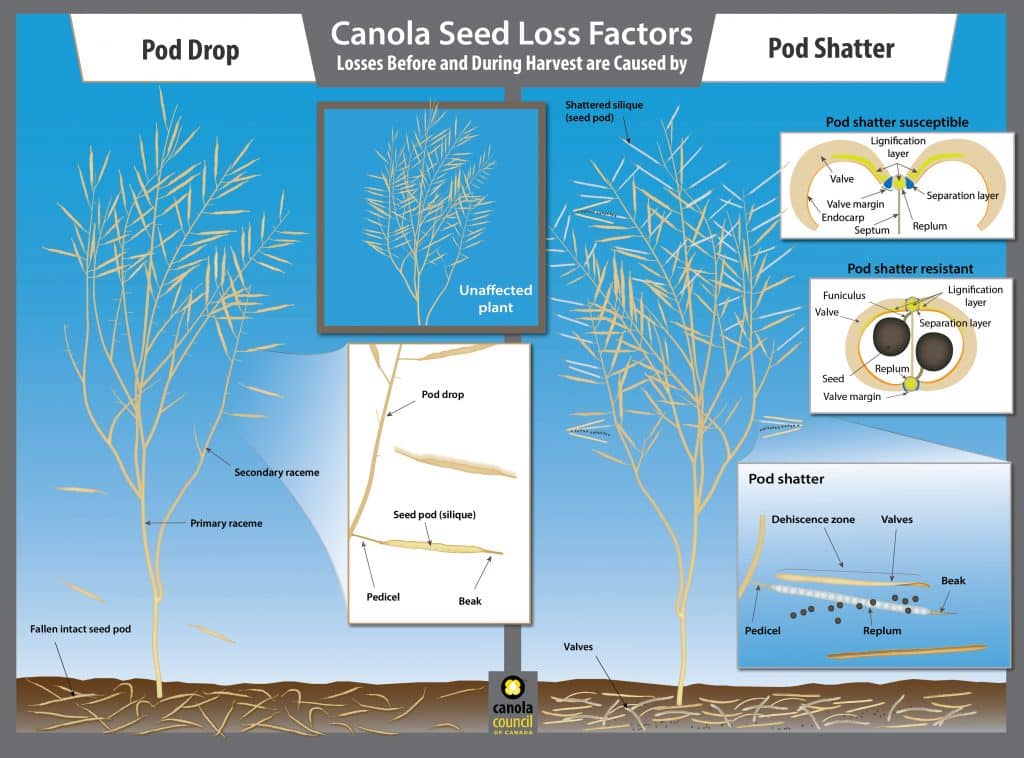
- Pod Integrity: Pods that have been affected by disease, environmental factors (e.g. hail, frost), or insects may be at higher risk for pod drop and pod shatter. If a high degree of pods are compromised, consider the potential losses that may occur as they dry down and become shatter prone.
- Frost risk: Canola seed is at significant risk for fall frost damage until seed moisture drops below 20 per cent. This moisture drop can take longer in a standing crop.
- Plant stand: A thin, short or lodged stand with minimal stubble to anchor the swath could be more prone to wind damage in the swath.
In addition, short, severely lodged, or excessively branched canopies may be candidates as well, because if swathed, there would be minimal stubble left to anchor the swaths from moving with wind. In this situation growers should consider the potential for wind damage to the swath relative to shattering risk if left standing.
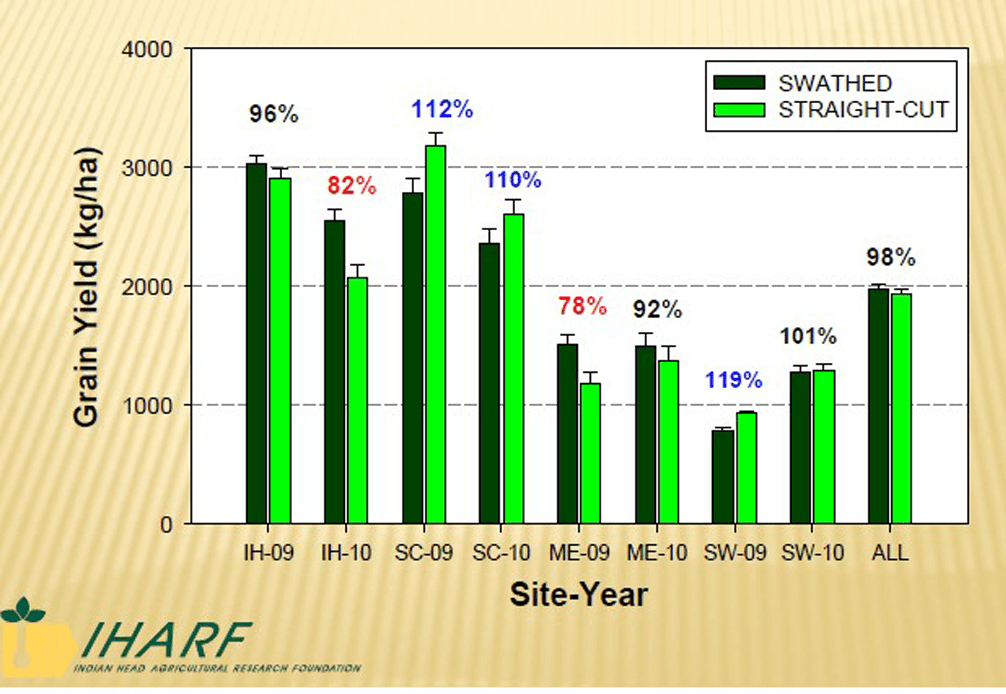
Research conducted at Indian Head Agricultural Research Foundation (IHARF) from 2011-2014 (Figure 1) found that with an imposed three- to four-week delay of straight cutting after the seed had reached 10 per cent moisture content, there was an average yield reduction of 15 per cent across all sites and all varieties 2.
When straight cutting harvest was timely, environmental yield losses were below five per cent at the majority of the sites. Hybrid choice did have an effect on yield losses, but environment and site played a large impact, indicating that so long as straight cutting can be timely, it can be successfully accomplished with most canola hybrids.
Pushing canola
Although pushing canola is a rare practice on commercial farms in Western Canada, it is a potential replacement for swathing. Pushing mechanically lodges the crop to restrict pod movement but also let the crop mature while still attached to the root system. Pushing can occur at the start of seed colour change without any negative impacts on grain yield, green seed and oil quality. In research trials, pushing worked best when crop stand and growth were adequate, as well as when canola was pushed at or before 30 to 40 per cent seed colour change (when canola is physiologically mature) 3.
Contribution margin of pushing was variable in trials compared to direct combining (without pushing) or swathing 4. In 2001 and 2002, pushing had lower contribution margin than direct combined canola at all three site-years while having similar yields.
Swathing canola
Timing, quality and yield
Producers who wait until the canola crop is (at least) at 60 per cent seed colour change (SCC) on the main stem to swath or straight cut, can potentially maximize both yield and quality 4, 5.
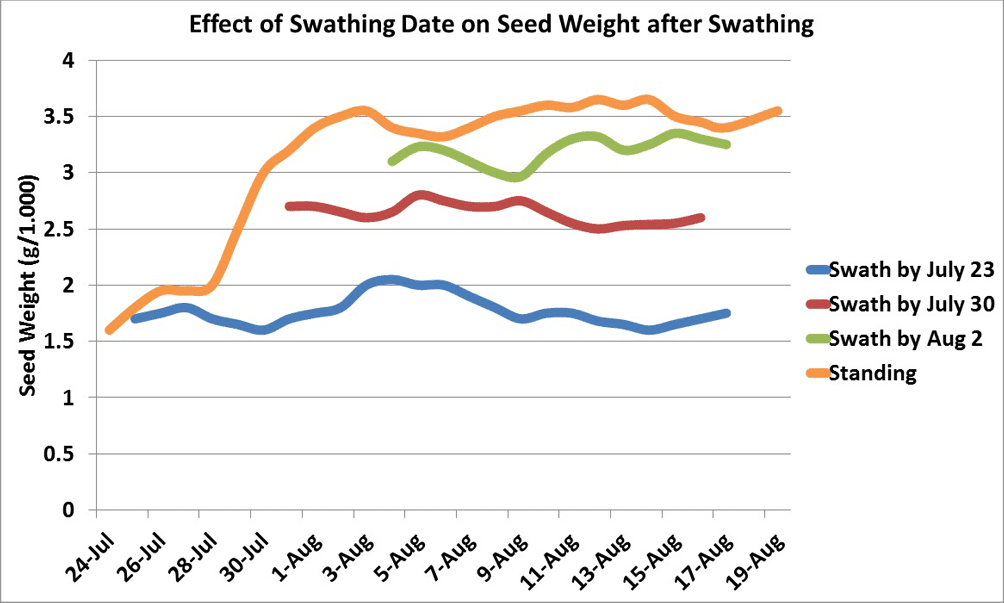
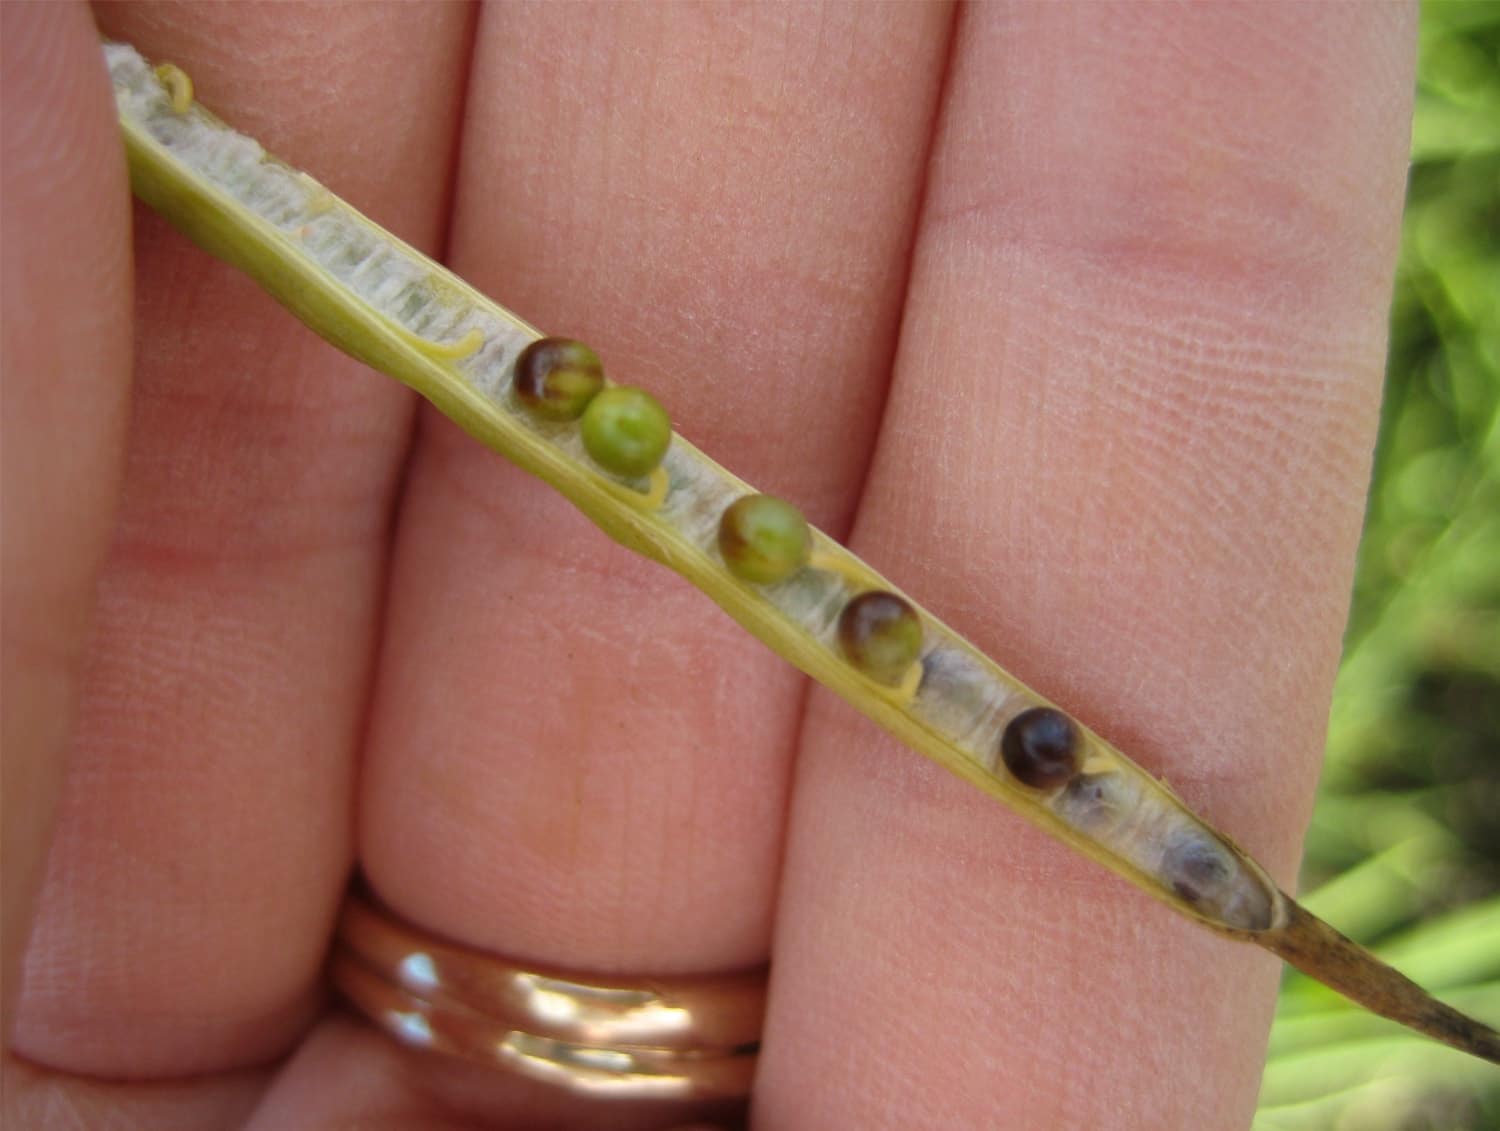
Once canola plants are swathed, the seed does not continue to fill (Figure 2) 6. So seed that is swathed before accumulating its full complement of oil and protein will not accumulate any more after swathing, resulting in potential yield loss.
Increases in thousand kernel weight, seed size and oil content were also observed for later swathed and straight cut canola 4, 7.
Reductions in seed protein and seed oil were observed when swathing took place before 20 and 30 per cent seed moisture, respectively. Seed oil fatty acids also tend to stabilize near the end of seed development (30 per cent seed moisture), strengthening the argument in favour of delaying swathing to near complete seed maturity 7.
Green seed
Time of swathing usually has little effect on green seed levels, except under abnormal situations 8. Keep in mind that the distinctly green cut-offs for grades No. 1, 2, and 3 Canada canola are two, six, and 20 per cent respectively. More information on canola grading can be found in the grain grading guide or from the Canadian Grain Commission.
Green seed occurs when the chlorophyll in the seed has not degraded or cleared. Green seed appears to be related to maturity as well as environmental factors. In particular, temperature influences the rate of chlorophyll clearing as well as the timing relative to seed development, as measured by the decrease in seed moisture content 9. An inherent difference between the species causes B. rapaAlso referred to as Polish canola, it is the less commonly grown species of canola currently grown in Canada. More to clear its chlorophyll more readily than B. napusAlso referred to as Argentine canola, it is the species of canola currently commonly grown in Canada. More during seed ripening.
The crop needs time to cure after swathing. The enzyme responsible for clearing chlorophyll requires moisture. If moisture in the swath is good and temperatures are moderate, green seed may drop to an acceptable level for combining within, or less than, 10 to 14 days after swathing 10. Under dry or cool conditions, curing may take longer.
However, swathing early does not necessarily increase the green seed levels 8. Under abnormal conditions, swathing too early can occasionally result in green seed when plants are under moisture stress and hot, windy weather dries out the pods, and seed in the swath, before chlorophyll has had a chance to clear.
Frost
The majority of the canola green seed problems in Western Canada are usually the result of frost. Even a light frost can fix the green colour by damaging the enzymes that clear the chlorophyll in higher moisture seed, preventing additional clearing regardless of how favourable weather conditions may become. A killing frost also causes rapid dehydration of seed and plant tissue, which may be just as important for reducing the ability of these enzymes to function properly. The seed enzymes that clear chlorophyll work rapidly at high temperatures but slowly at low temperatures.
Freezing temperatures have much less effect on seed chlorophyll content at lower seed moisture levels. Seed at less than 20 per cent moisture should typically be safe from frost damage. Swathing one to three days prior to freezing temperatures may reduce seed chlorophyll levels by allowing for a more rapid seed dry down when compared to standing crops at the same stage of maturity. The time required to dry down the swathed crop to a safe moisture level is always dependent on the weather conditions experienced following swathing 11.
To minimize high green seed:
- Consider swathing B. napusAlso referred to as Argentine canola, it is the species of canola currently commonly grown in Canada. More varieties as early as 10 to 15 per cent SCC on the main stem in fields at high risk of fall frost damage, especially in short season areas where risk of early frost is elevated.
- Avoid swathing too early in hot, dry weather (30 to 35 degrees Celsius), but assess crop development frequently as SCC will happen more rapidly. The heat can rapidly dry the crop, resulting in shatter losses from swathing too late, or excessive seed shrinkage and lack of curing due to premature dry down from swathing too early.
A killing frost will reduce seed quality, and time in the field or in storage will not generally reverse that quality degradation. Immature seeds (moisture content higher than 20 per cent) will be damaged.
Green seed is the major downgrade that results from frost.
The degree and duration of frost and the moisture content of canola seed will influence the type and amount of damage. Canola seed below 20 per cent moisture will not normally be damaged by frost. Frost in excess of minus five degrees Celsius at high seed moisture content is generally lethal, resulting in non-viable seed. Such frosts are lethal due to formation of ice crystals that physically disrupt structures such as membranes and enzymes. Pods in immature canola crops frozen at lethal temperatures have been observed to turn black, whereas mild frost turns pods white or white-speckled. Lethal frost at greater than 45 per cent seed moisture content will cause seed shriveling since dry matter accumulation is not complete 12.
Mild, non-lethal frost damages canola seed by interfering with chlorophyll degradation, thus creating green seeds. Initially, mild frosts were thought to damage the de-greening enzymes, but research has shown that chlorophyllase activity is activated and synthesized following frost. Peroxidase activity is inhibited following sub-lethal frost and could be partly responsible for de-greening failure.
The main effect of mild frost is to cause an accelerated desiccation, which forces a premature transition from the grain-filling to pre-desiccation stage. After a mild frost, there is a rapid moisture loss from pod walls, followed by rapid moisture loss from seeds. De-greening enzymes thus are not able to complete pigment degradation 13.
For example, canola plants subjected to minus five degrees Celsius at 50-75 per cent seed moisture dried rapidly to 12-15 per cent in eight days, whereas control plants lost little moisture over that time period. Seed from the frozen plants lost a little chlorophyll in the first four days after the frost, but none after that. In comparison, the control plants lost 70-80 per cent of chlorophyll in eight days. In some experiments, pigment synthesis was actually renewed for a short period after a mild frost.
Green seed has been created by rapid drying in the lab or field, which supports the “desiccation by frost” theory. In addition, re-hydrating frost-induced green seeds to 20 per cent moisture for seven days led to a 25 per cent reduction in total pigment content. Germination was not stimulated since the active stage of germination begins after the seed has imbibed enough water to reach 40 per cent moisture 13.
Freezing of immature canola seed might cause subtle to significant effects on oil and protein. This is because protein synthesis continues later than lipid synthesis. Early frost may also lead to chlorophyll accumulation, free-fatty acid development and other physiological changes that can further reduce canola quality.
If frost hits a standing canola crop, note the temperature and duration of the frost in the morning and monitor crops closely. The amount of frost damage depends on various factors including crop stage, degree and length of frost, relative humidity, and presence of rain or dew. In many cases, a light frost will damage the outside of pods but seeds can continue to mature. Canola left standing after a light frost can see increased yield and quality.
Swathing to limit losses from an upcoming frost event could potentially incur more losses due to premature swathing. Here are some tips to consider when dealing with a potential or recent frost:
- The canola will only be safe in the swath if it has enough time to drop below 20 per cent moisture. There is some limited potential for insulating effects of the ground and the swath itself.
- If the pods are desiccating rapidly and there is seed colour change on the main stem, swathing could be the best option to avoid significant pod drop and shelling losses.
- If the pods low in the canopy weren’t affected and are still green, it will likely be best to let the crop continue to mature.
- If the upper portion of the plant was severely damaged, it may pay to wait to swath and let these pods shell out, reducing the overall yield but potentially saving grade.
Assessing seed colour change
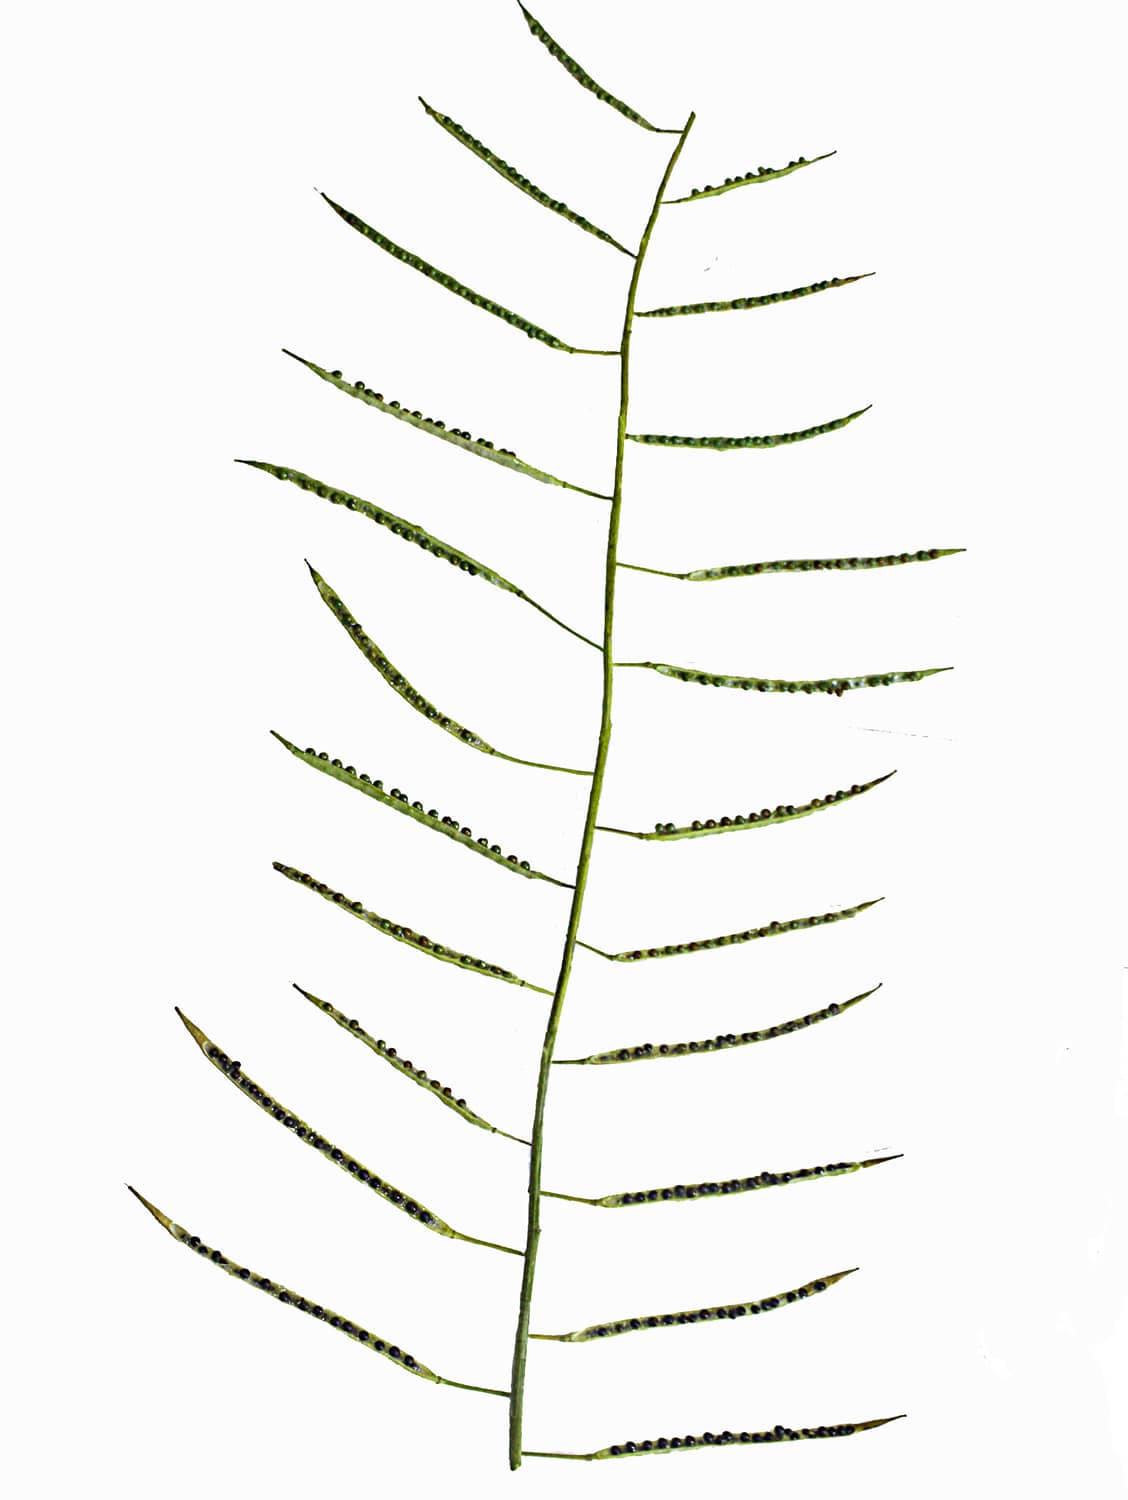
Seed in all pods on a plant reach physiological maturity and complete filling at about 40 per cent moisture. Physiologically mature seed loses moisture at about one to three per cent per day. Seeds slowly turn from green to light yellow (or reddish-brown) to brown, depending on the weather and cultivar (varietyA variety is a variant of a species that evolved in nature without the intervention of humans, e.g. Brassica oleracea variety (in short form, var.) botrytis (cauliflower), var. capitata (cabbage), var. italica (broccoli), etc. More). This curing process starts from the bottom of the main stem. Seed colour change will then progress up the main stem as moisture content is reduced.
Seed colour change will advance an average of 10 per cent every two to three days. Under hot, dry conditions, seed colour change can occur more rapidly and may take longer at cool temperatures. The crop is at the optimum swathing stage for only three to five days under good drying weather.
B. rapaAlso referred to as Polish canola, it is the less commonly grown species of canola currently grown in Canada. More varieties can be swathed at 40 per cent seed colour change on the main stem, due to their tendency to clear chlorophyll more readily.
The colour of the seed is a good indicator of seed moisture content and is more important than the overall plant, pod or field colour in determining the stage of crop maturity. Visual indicators will vary between varieties. Some varieties will appear ripe on the outside before the seeds are mature, while others will retain green pod colour after the seed is quite dark. These tendencies may vary depending on environmental conditions.
Tips for assessing seed colour change:
- Start inspecting your canola field approximately 10 days after flowering ends. The end of flowering is defined as the stage when only 10 per cent of plants have any flowers.
- Take time to assess a field. Sample various parts of the field to make an accurate assessment of the overall maturity of the crop. Stand on the road or in the back of your truck box to compare low lying to higher elevated areas of the field, taking note of how each area appears.
- Walk out and sample at least five plants in each of those areas. Examine only pods on the main stem. Seed in pods on the bottom third of the main stem mature first and will turn colour much sooner than seed in the pods of the top third of the main stem. Count seed with small patches of colour (spotting) or seeds that have changed colour completely as “colour changed”.
- Use the swath timing image to assist in determining seed colour percentage on the main stem. Include seeds with small patches of colour (spotting). Most of the seeds in the top pods will be firm and roll without being easily crushed between the thumb and forefinger.
- Once all areas are sampled, calculate the average seed colour change for that particular field.
- Continue inspections every two to three days. Average seed colour change will typically increase about 10 per cent every two to three days. Under hot, dry conditions, seed colour change can occur more rapidly. When conditions are cool, seed colour change can take longer.
Some fields, or large areas within a field with low plant populations, may have plants with numerous branches. In these scenarios, assess not only the main stem, but side branches as well to ensure seeds that have not changed colour are firm with no translucency. These seeds should still mature.
For more descriptions and images, view the Canola Swathing Guide.
Determining maturity in low plant populations
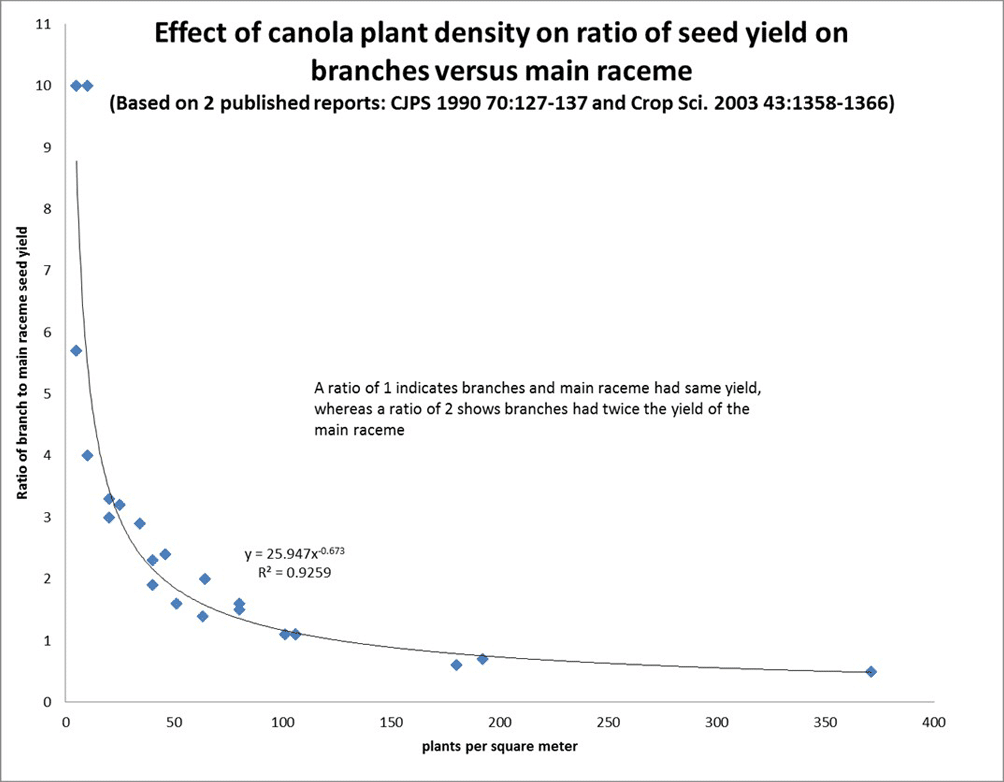
In canola stands with low plant populations, the architecture of the plants changes and more branching occurs. As plant population decreases, the number of pods per plant increases 14.
Contribution to yield by the main stem is reduced in these types of stands, whereas the contribution to yield from primary and secondary branches increases significantly. Canola plants mature from the bottom of the plant up and from the middle outwards. Therefore, this additional branching in stands with reduced plant numbers may lead to a larger proportion of pods containing immature or even translucent seed as the main stems approach the recommended swathing stage (at least 60 per cent seed colour change). In these cases, it is best to consider the seed colour change of the whole plant rather than just looking at seed colour change on the main stem. Try to delay swathing until seeds in upper and outermost pods are at least firm and green to minimize potential yield loss and green seed, provided this can be done without significant shattering of main stem pods.
Assessing maturity in uneven fields
In canola stands with adequate plant populations but variable maturity (resulting from issues like uneven emergence), it will still be appropriate to assess maturity of individual plants based on the seed colour change on the main stem. However, optimizing returns will depend on assessing the percentage of plants at each stage of maturity and accurately estimating which growth stage represents the greatest proportion of the yield within the field.
To start the assessment, first segregate the field into areas with obvious differences in overall maturity. These different maturity zones will often be linked to the topography of the land, but not always in the expected ways. While the hills typically tend to be drier and hence quicker maturing than mid slope to lower level areas, delayed germination on the hilltops in dry spring conditions or excess moisture stress in lowlands can sometimes cause the opposite scenario. A grower may want to open up the field by swathing one round around the outside edge of the field to make a better assessment.
In addition to identifying different maturity zones, assess the crop based on this criteria:
- Within each distinct maturity area (or zone), assess a smaller 10 by 10 metre area. This should represent a big enough sample area to encompass the varying stages of crop within the larger maturity zone.
- Start by pulling some of the ripest representative plants and counting pods on main stem, then on side branches (primary or secondary). This will help determine where the bulk of the yield will be (e.g. main stem or the side branches).
- Next pull apart pods on the main stem, looking at the number of seeds per pod and the percentage of seed colour change taking place inside. Then assess the major branches for the seed number and colour change as well as signs of firmness (which is an indicator of physiological maturity). Roll green seeds between your fingers. If they squash easily, then the seed is still moist and not ready.
- If the most mature plants are still too immature for swathing, then note or GPS the sample location so you can return in a few days to re-evaluate the maturity. Seed colour change will typically increase 10 per cent every two to three days, but will be quicker in hot dry conditions. If the assessment of the ripest plants indicates they are ready, then move to later maturing areas or plants within the sample area, and count more pods, checking seed colour change and firmness. Keep in mind that translucent seeds are very immature and will likely be lost if not left to mature further.
- Finally, sample from many areas within the field to adequately assess the overall readiness for swathing (at least one sampling within each maturity zone identified at the start). This may also help determine if some areas of the field should be managed separately.
- Once you have completed this, you should have a good picture of the range of maturity in that zone within the field and be able to assess the portion that is ready and the portion that would benefit from delaying swathing.
Swathing tips
Avoid swathing during hot (30 degrees Celsius or greater), dry weather, as rapid desiccation that results under these conditions may cause chlorophyll clearing to stop prematurely. This may result in some immature seed with green colour. The enzymes responsible for clearing the chlorophyll require moisture. Swath during cool evening hours, at night or early in the morning to allow seeds to dry down at a slower rate. This lowers the chance of green seed and lower oil content. Rain or irrigating the crop will help maintain moisture in the seed. Delaying combining can often allow some of the green seed colour to clear in the windrow (swath).
The draper belt style of windrower, most commonly used for grain crops, is far superior to the auger style that is typically used for hay crops, because of the greatly reduced crop damage. Regardless of the equipment used, the crop must flow smoothly through the swather without bunching. Stands that are exceptionally tall, thick or lodged and tangled increase the difficulty of laying a smooth, uniform windrow. Bunching leads to uneven drying and combining problems. As well, bunching can lead to development of diseases such as sclerotinia stem rot if weather is wet or humid. At the bottom of bunched or heavy swaths, sclerotinia stem rot can damage up to 50 per cent of the canola pods.
Cutting the crop just under the pods reduces the amount of crop passing through the throat of the swather. This leaves a maximum amount of stubble to lay the windrow on. The stubble anchors the windrow to minimize the effect of wind and helps ensure adequate air circulation through the swath. This also minimizes the amount of material that must be handled by the swather and combine.
If bunching occurs, adjust the width of cut, height of cut and the forward speed of the swather so that the throat of the machine will handle the swath without bunching.
Swather settings to consider:
- Set the reel as high and as far forward as possible with the bats at the top of the crop to hold plants gently against the knife.
- Adjust reel speed slightly faster than the ground speed of the swather. This minimizes seed shatter and crop tangling, but is still adequate to keep crop flowing over the knife and helps push the crop out of the opening. Draper belt speed needs to be adjusted to coordinate with ground speed. This means that the crop must flow smoothly in a continuous stream. Using too slow of a belt speed causes the crop to concentrate on the belts and thus create extra loading for the belts and results in a compact, bunchy windrow. Using too fast of a belt speed can pull the crop away too fast, again causing breaks in the windrow uniformity. If the canola has a higher percentage of mature seeds, the higher belt speed can contribute to increased shelling.
- Swath rollers help to anchor the windrow into the stubble so that it is less susceptible to wind damage. Set the roller so that it just anchors the swath into the stubble without shelling any ripe pods. Excessive pressure on the roller will produce a swath that is too compact to dry quickly and difficult to pick up without shelling the canola. Leave the swath as high as possible in the stubble so that the combine pickup can slip under it without tearing the cut crop.
Pre-harvest aids and pod sealants
Growers who decide to direct combine their canola can consider a pre-harvest aid, either for weed control or to facilitate the harvest operation via plant dry-down. While these products can hasten dry down of mature plants, true desiccants will kill any immature ones. If applying pre-harvest aids with ground sprayers, crop dividers could reduce the amount of crop loss due to trampling and shattering.
Remember to use only products that are registered for pre-harvest application at their label specifications for rate, water volumes, and timing. The use of off-label rates or products may leave unacceptable levels of residue in the seed. Also note that more than one pre-harvest glyphosate application will exceed maximum residue limitsThe greatest amount of a particular residue (ex. pesticide residue) that is allowed to be found in a sample (ex. of a canola shipment). More (MRLs) and is not recommended. Growers that would like to apply a second pre-harvest herbicide will have to consider a different product. In all cases, check the pre-harvest intervals of all your desiccant options or find a desiccant that best suits your timeline at spraytoswath.ca.
Pre-harvest aids
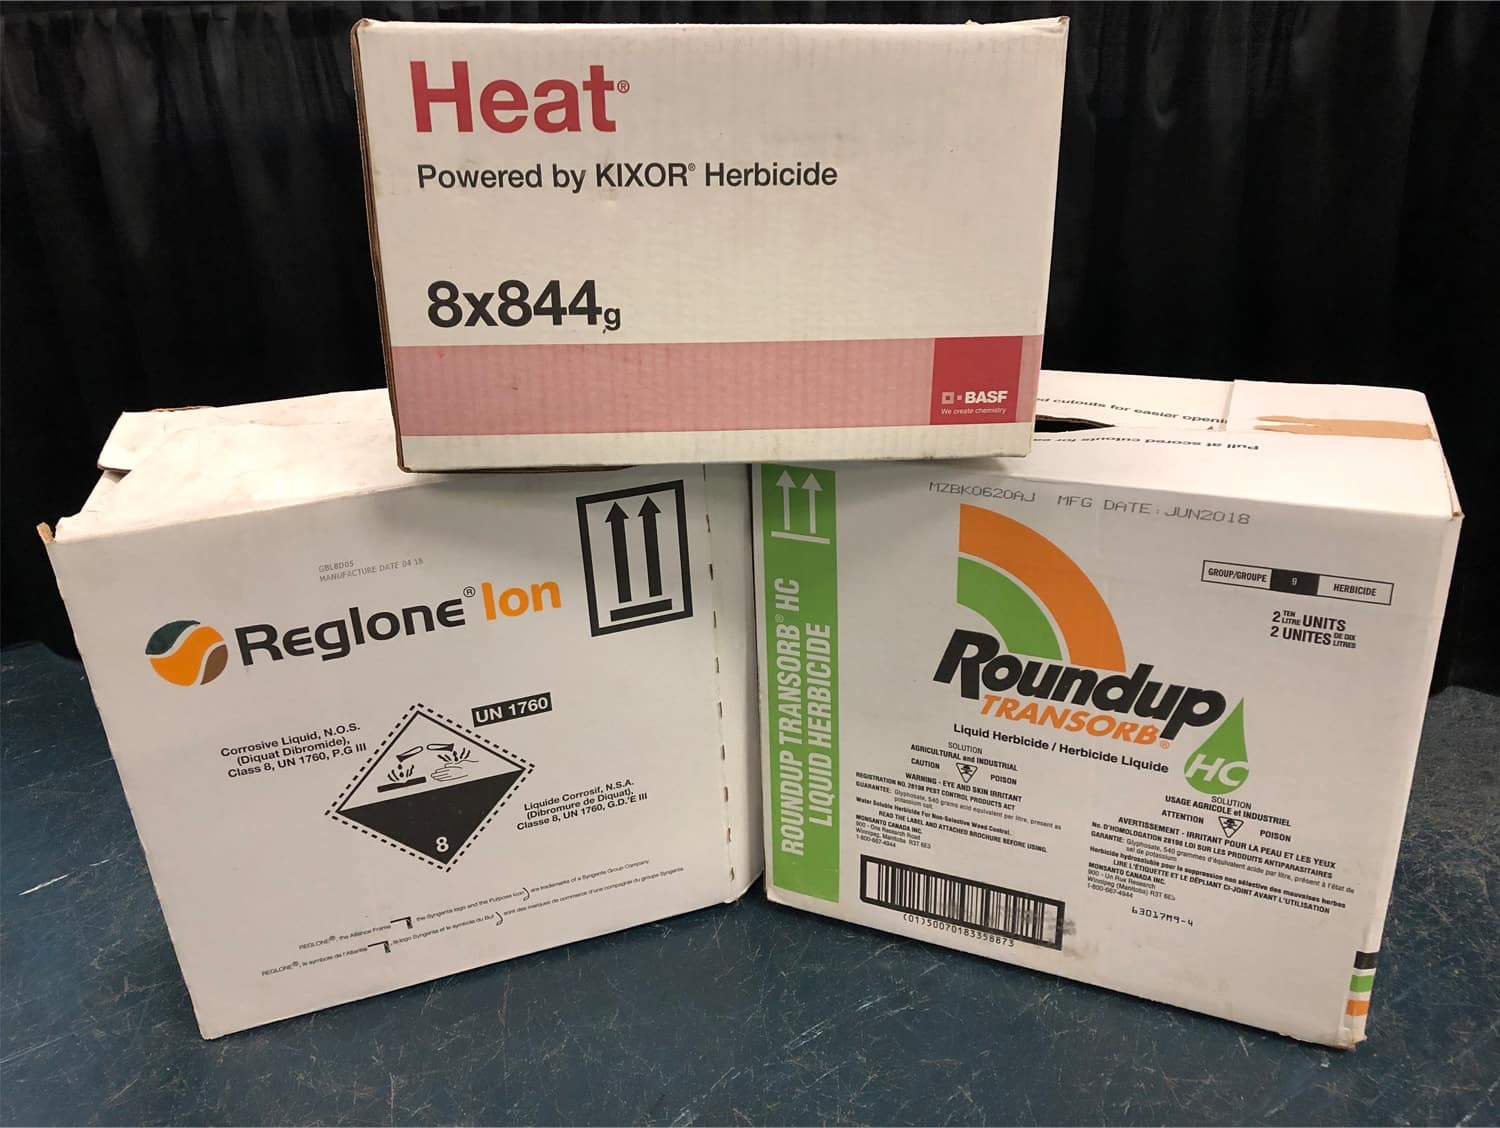
Diquat (commonly sold as Reglone or Reglone Ion by Syngenta) is a chemical desiccant that will dry down green growth on contact, but will not provide perennial weed control. Glyphosate should primarily be used for perennial weed control, but it can achieve a degree of crop dry down on warm, sunny days. Saflufenacil (sold as Heat LQ from BASF) is considered a pre-harvest aid which has a degree of both systemic and contact activity (unlike a desiccant and the purely systemic activity of glyphosate).
To summarize the key qualities of these options:
- Desiccation (Diquat) = fast drydown
- Pre-harvest glyphosate = perennial weed control
- Heat LQ (Saflufenacil) = dry down and annual weed control
None of the registered pre-harvest aids will hasten maturity. Growers should assess their needs to determine if a pre-harvest aid is necessary.
Pre-harvest treatments generally have little or no effect on canola seed yields, seed weight, seed germination, green seed content or oil content when applied at the proper stage 15.
To ensure the correct pre-harvest intervals are always known, use the Spray to swath interval calculator.
Diquat products are the only desiccants registered for use on canola. Diquat does not bring upon maturity of the crop, rather it rapidly desiccates the green material of the plant that it contacts. Therefore, canola must be desiccated at the correct stage to avoid locking in green seed, optimizing yield and seed quality. The timing to apply Reglone Ion is when the crop is at 90 per cent or more brown seed. This means that 90 per cent or more of the entire plant’s seed is totally brown in colour (unlike a seed colour change rating, which only refers to the main stem and includes anything with any degree of colour change). Combine as soon as the crop is dry, which may be in about four days, and no later than 14 days after application.
Diquat product performance will be enhanced if sprayed on cloudy days or in the evening (as the product is activated by sunlight and may not have enough time to spread over the plant before activation when sprayed in sunny conditions). Shattering losses can increase if heavy winds, rain or hail occur after the crop has dried down. Warm, sunny days following the application are ideal. Syngenta only supports the use of Reglone on canola varieties with a stated shatter-resistance claim.
Glyphosate pre-harvest translocates within perennial weeds, slowly killing the plant. Glyphosate affects seed germination and is not recommended on crops grown for seed. On Roundup Ready canola varieties, a pre-harvest glyphosate application will provide perennial weed control, but it will not dry down the crop. Apply when the crop has 30 per cent or less seed moisture content, ideally at around 60 per cent seed colour stage (or at recommended swath timing).
Seed and foliage moisture drydown may not be greatly enhanced by glyphosate treatment. Where there may be some activity is earlier in the fall, when days are longer and are warm and sunny. Extremely cool, wet and/or cloudy weather between the time of application and the anticipated harvest date may slow down activity, thereby delaying crop drydown and harvest date. Check the Roundup Transorb label for more details.
Heat LQ (saflufenacil) should be applied when the crop has reached 80% seedcolour change to enhance dry down of the plant material on all herbicide-tolerant canola systems, and provide some broadleaf weed control (refer to label for list of registered weeds). When applied as a standalone product, Heat LQ should be treated more like a contact product, with increased water volumes and use of the higher rate structure of 59 millilitres per acre. A tank mixCombining two or more crop protection products (that are compatible) in one application. More with glyphosate provides a wider range of weed control.
Pod sealants
Pod sealants were developed to reduce shattering losses by preventing the pods from splitting open during ripening.
Saskatchewan studies with eight site-years comparing untreated and pod-sealant treatments on direct combined canola found no advantage to pod sealants in 75 per cent of the site-years. A marginal profit advantage was found 13 per cent of the time and a marginal loss was determined 13 per cent of the time. No significant difference was observed when averaged across all treatments 16. A replicated field trial in North Dakota, found similar yield for the anti-shattering agent and the control in a 2005 study 17.
Combine timing is crucial for minimizing shatter losses when using pod sealants, as the sealant efficacy diminishes with time and from repeated rains. Sealants slow crop drydown and harvest by five to 14 days. This could be a concern in shorter season growing areas.
Information provided by the manufacturers suggests that application timing should be targeted when the majority of the pods are changing colour from green to yellow but the pods should still be pliable enough to fold over without splitting open. Seed colour change should have occurred within the pods to allow curing and harvesting within the window of protection provided by the pod sealant. The best advice is to consult with company representatives on the ideal timing for your fields.
Stick with the high water volumes recommended by the company. Thorough coverage of all the pods is very important because these products form a physical coating to seal the pods against splitting open.
Harvesting canola
Harvesting swathed canola
Swathed canola is ready to harvest under normal conditions about five to 14 days after cutting, when moisture content has dropped to around 10 per cent, which is the official limit for dry canola. (For safe long-term storage of at least five months, canola should be conditioned to eight per cent moisture and less than 15 degrees Celsius. Most seed will be mature with little or no green colour. Use a properly calibrated moisture meter to ensure correct assessment of moisture content.)
If there is green seed present, allow a few more days in the swath for further colour change. Green seed may change colour in the swath but does not change significantly once combined and stored.
Before combining, use a crush strip to determine the amount of seed that is green inside. A small percentage of green seed will reduce grade. (No. 1 Canada allows two per cent distinctly green, No. 2 Canada allows six per cent and No. 3 allows 20 per cent.)
The use of wide swathers on tall, heavy crops can result in very large swaths that can take longer to cure, especially at the centre of the windrow. Bunching in the swaths also may contribute to a green seed problem as the crop dries out and cures unevenly. Canola swaths tend to dry quicker than cereal swaths after a rain or heavy dew, so combining can begin sooner. The chances of taking off top grade canola under rainy conditions are much better than with cereals, as canola typically retains its quality better in the swath.
To minimize pod shatter at the pick-up header, adjust pick-up speed so that the windrow will be gently lifted without tearing or pushing. Set the pick-up height to run just under the swath. If the pick-up is run too high or too fast, the swath will be abruptly lifted onto the table which may cause shatter loss. However if the speed is too slow, the swath will be pushed, causing shatter loss and causing the crop to feed in bunches, which hampers combine operation.
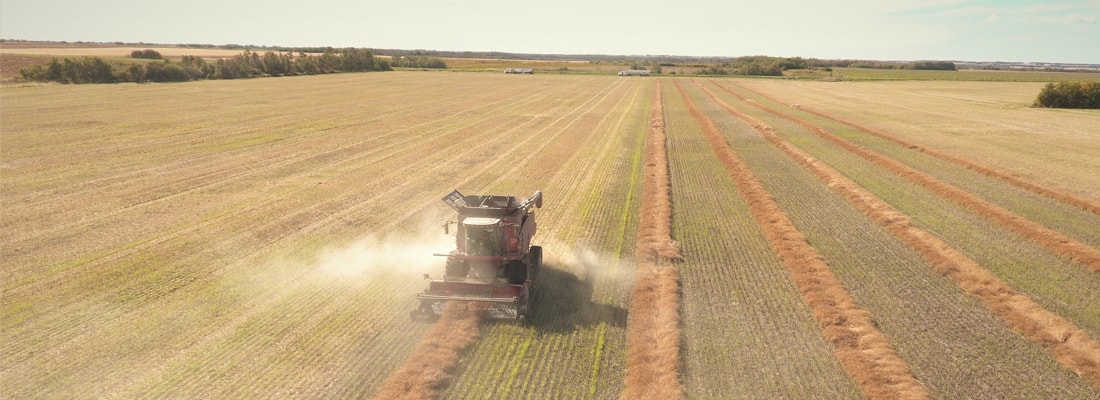
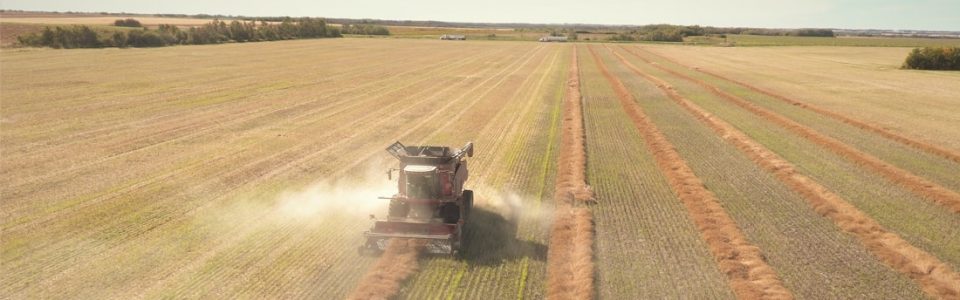
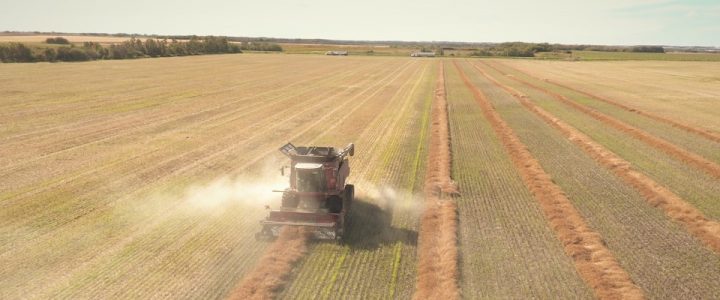
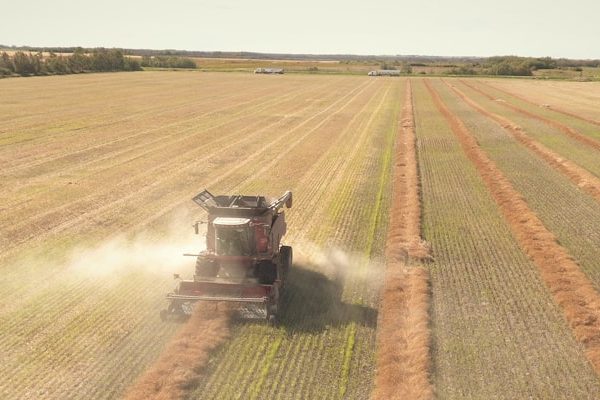
Direct combining/straight cutting canola
B. napusAlso referred to as Argentine canola, it is the species of canola currently commonly grown in Canada. More varieties are more prone to shatter than B. rapaAlso referred to as Polish canola, it is the less commonly grown species of canola currently grown in Canada. More (Polish) varieties, but new B. napusAlso referred to as Argentine canola, it is the species of canola currently commonly grown in Canada. More (Argentine) varieties with shatter resistance are now on the market. Certain characteristics of a canola crop and field may make for a more positive direct combining experience, such as:
- slight lodging to protect from wind events
- plants are well knit together
- good pod integrity due to limited disease (e.g. alternaria or sclerotinia), hail, or insect damage
- evenly matured
- relatively even field topography
Canola is ripe when the pods are dry and rattle when shaken. Seed is dark brown to black in colour at maturity depending on cultivar (varietyA variety is a variant of a species that evolved in nature without the intervention of humans, e.g. Brassica oleracea variety (in short form, var.) botrytis (cauliflower), var. capitata (cabbage), var. italica (broccoli), etc. More). Stems may still be green and high moisture at this stage. Start harvesting when overall seed moisture has fallen to 10 per cent moisture or less and green seed is minimal, ideally two per cent or less.

At 10 per cent moisture and above, canola in storage can heat rapidly on hot days, particularly if canola goes into the bin warm, contains a lot of green weed seeds, stalk and pod material, or has a significant proportion of immature seeds. Be prepared to aerate or dry the seed as needed.
The longer a ripe B. napusAlso referred to as Argentine canola, it is the species of canola currently commonly grown in Canada. More crop stands in the field, the greater the potential for shatter losses. Rain on a standing crop increases the potential for shatter losses as it promotes saprophytic organisms growing on the pods.
Losses at the header and dividers is expected when direct combining canola. Recent work by PAMI evaluating different header systems and losses during direct combining of canola across three Saskatchewan sites found that the largest factor impacting harvest losses was the cultivar (varietyA variety is a variant of a species that evolved in nature without the intervention of humans, e.g. Brassica oleracea variety (in short form, var.) botrytis (cauliflower), var. capitata (cabbage), var. italica (broccoli), etc. More) and whether it contains a degree of shatter resistance. For information on Western Canadian canola cultivar (varietyA variety is a variant of a species that evolved in nature without the intervention of humans, e.g. Brassica oleracea variety (in short form, var.) botrytis (cauliflower), var. capitata (cabbage), var. italica (broccoli), etc. More) trial results, check out canolaperformancetrials.ca.
The study also found that both auger and draper headers can be used to direct combine canola. Losses will likely be greatest with a conventional auger header with the knife close to the auger. Along the length of the header, losses are greatest in the centre nearest to the feederhouseThe opening of the combine where crop is fed into, from the header. It leads to the threshing components of the combine. More of the combine, and at both dividers. Some differences in the degree of losses were noted when comparing rotary, vertical knife and stationary dividers. Rotary dividers experience higher losses than vertical knife dividers, and the stationary divider can have the highest losses, in comparison, on the knife-drive side of the header.
In heavy and lodged crops, a pick-up or finger reel may improve feeding. Crop lifters may also provide some improvement. A full-fingered auger can improve feeding for bushy crops. Reel height and speed appears to more critical for feeding of a draper header as compared to an auger header. Match reel speed to the speed of the combine, and keep it as high up as possible to avoid shelling. Positioning the reel out front of the table of the header could cause higher seed losses. For more information and to see a full report on this project, visit pami.ca.
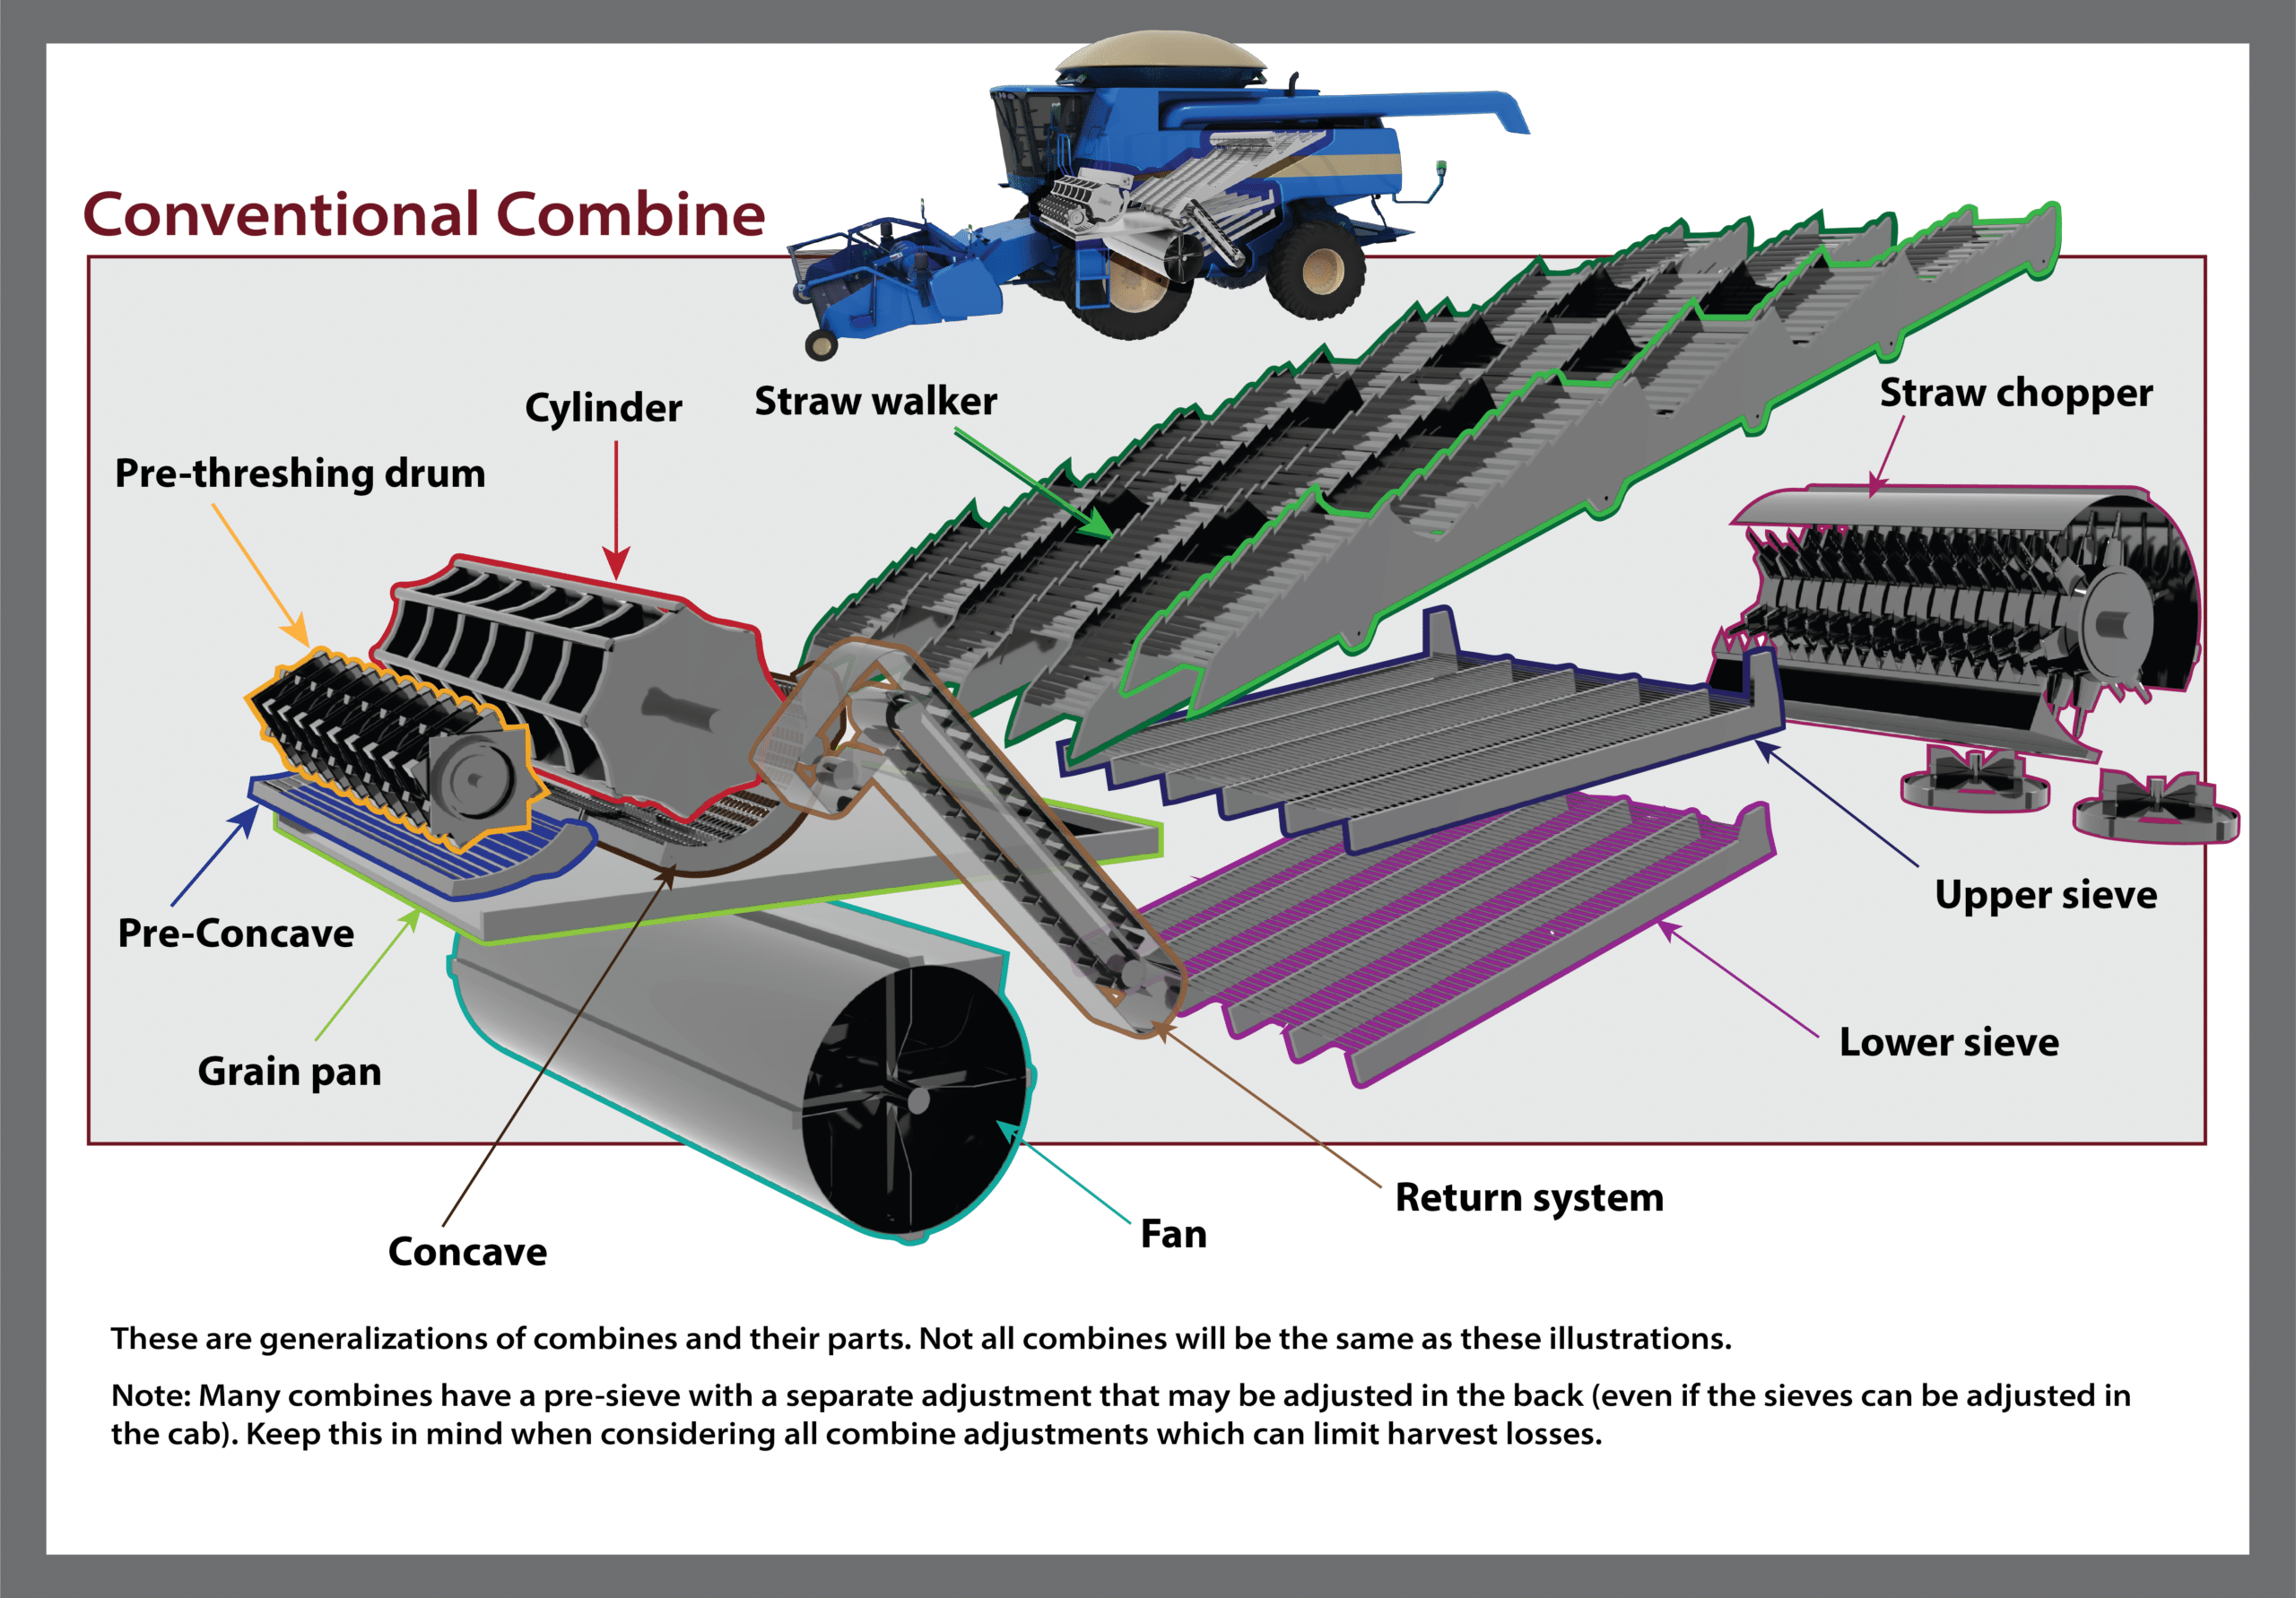
Combine basics
- Gathering: getting the crop into the header; getting it up the feeder and into the separator.
- Threshing: The goal is to achieve complete threshing within acceptable limits of seed damage. In most canola crops the biggest concern is seed damage. However, threshing is a major factor in breakdown of the material other than grain (MOG). The condition of the MOG will affect separating and cleaning. UnthreshedSeed that remains in the pod (ex. for canola) or head (for cereal) after a cycle through the combine. More loss should be negligible in canola.
- Separating: Getting seed out of the MOG without separator loss is the main challenge. However, excessive MOG separation can overload the cleaning shoe with chaff and debris. Separating loss should be less than 0.5 per cent of the yield.
- Cleaning: Minimize shoe lossSeed losses originating from the sieves of the combine (during harvest), since the separation area (sieves) at the rear of the combine can be referred to as the "shoe." More to ideally less than 0.5 per cent of yield. The sample cleanliness depends upon the owner’s tolerance for dockage and issues of handling. Achieving a very clean sample should not come at a cost of shoe lossSeed losses originating from the sieves of the combine (during harvest), since the separation area (sieves) at the rear of the combine can be referred to as the "shoe." More or extra seed damage. Often in an attempt to maximize cleaning capacity the return tailing is loaded to the point that tailings plugging can become a limiting factor in productivity.
Consult combine manuals for operational settings. For auto adjust controls, calibrate and check settings to ensure the combine is operating as indicated.
For videos on preparing equipment and reducing combine losses, check out our YouTube playlist.
Combine tips and settings
Before harvest time, check your combine’s mechanical system completely and repair or replace components that are likely to fail, to minimize downtime during harvest.
As soon as you start harvesting canola, pay attention to the following hints:

- Check for leaks. Losses do not always come out the back end. Assess your header for the source of losses, such as between belts, out of the table and the auger throwing seed out of the table. Look for holes and cracks between the feederhouseThe opening of the combine where crop is fed into, from the header. It leads to the threshing components of the combine. More and header, where the feederhouseThe opening of the combine where crop is fed into, from the header. It leads to the threshing components of the combine. More meets the combine, around stone trap doors, past separator covers and access holes, around the clean grain elevator (especially the access door), shoe seals, into the fan housing and the grain tank. Cover or repair holes or cracks. Duct tape, plastic tape, foam weather stripping, silicon rubber-sealing compound or even paper towels are handy tools. Steady leaks can add up to a significant cost. They can easily exceed the combine’s processing loss of a well performing machine.
- Feed the combine properly. Older rotaries work best with a narrower windrow which feed in “like a ribbon”. Usually they have relatively narrow feederhouses, so to handle wide heavy windrows they have to work hard to get the material in. This means that the table auger and feeder chain are often run faster than ideal, which results in more front-end loss. Conventional (straw walker) combines work best with a wider swath that creates an even matt over the full width of the cylinder and walkers.
- Slow down. Pushing the feedrate beyond its peak processing capability causes the system efficiency to breakdown. Sometimes this is a controlled reduction and sometimes it is catastrophic. The difference between peak efficiency and unacceptable can be a small change in feedrate. It may take just a small decrease in speed (such 0.2 or 0.3 mph) to provide a significant reduction in losses. This is best illustrated by comparing feedrate effect on loss by looking at a loss curve. As long as the loss remains fairly flat (at an acceptable loss) increasing feedrate (ground speed) has minimal effect. However, when feedrate reaches a point where the loss curve rises steeply, the combine’s capacity has been taxed and efficiency decreases. When testing to find your combine’s sweet spot, increase your speed in small increments and keep checking losses. When you observe a notable increase in loss, the combine is running at maximum efficiency for those settings in that particular crop. Combine adjustments and operating speed must be fine-tuned for conditions in the field.
- Keep combines in good mechanical condition. Worn or misadjusted feeder chain can lead to uneven feeding. A misadjusted clean grain elevator chain can cause seed damage. Make certain that the cylinder/rotor rasp bars are in good condition and properly aligned. Concaves must be true and properly adjusted. Straw walker curtains must be in place and in good repair. Broken, plugged or bent sieves make it impossible to get the best performance from the cleaning system. The fan inlets and bleed holes must be unobstructed. Worn or misadjusted drive belts can result in poor performance and plugging.
There are several combine settings which should be taken into account when optimizing harvest. Consider the following adjustments when harvesting canola.
- Table auger and feeder– Adjust the table auger to specifications and ensure that it can travel its full range of float, which should be five to 10 centimetres (two to four inches). The front elevator needs to carry a big volume of material so check the tension and freedom to float.
- Cylinder/Rotor speed- Canola is usually not a difficult crop to thresh. Under normal conditions, a lot of the seed is threshed going under the table auger and up the feeder elevator. Set the cylinder/rotor speed at about 50-60 per cent of that used for cereals. Set at 450-700 RPMs for small size diameter (approx. 61 centimetres, 24 inches) cylinders/rotors and 400 to 650 RPMs for larger (76 centimetres, 30 inches) cylinders/rotors. Excessive cylinder speed causes seed cracking and skinning. A high cylinder/rotor speed smashes pods and stems, which may generate increased chaff that can hamper separation and/or increases the shoe load. Slow cylinder/rotor speed increases the chance of plugging and puts more strain on the cylinder/rotor drives. Generally, use as high a cylinder/rotor speed as possible that still provides an acceptable amount of seed damage.
- Concave settings- The concave is generally set quite wide as compared to cereal crops. However, it should not be set completely open, as it can be helpful to back out any plugged material if the concave can be slightly lowered. It is preferable to have narrower spaced wire concaves to minimize the amount of stems being pushed down to the cleaning shoe.
- Straw walkers- Excessive pods, broken pods and stems separated by the walkers can overload the cleaning system and tailings return. In some cases, wire mesh over the walker surface has been successful in reducing excessive trash separation. Others have removed the straw walker risers to help material move over the straw walkers faster. However, most operators reduce the threshing aggressiveness with cylinder and concave adjustment.
- Fan adjustments, chaffer and clean grain sieve- For a given chaffer and sieve setting, consider this:
- Have operator feed crop in at 0.5 to 1.0 mph. Start at the low to mid range of recommended fan speed.
- Monitor if and where seed is coming off the chaffer and if minimal.
- Increase fan speed (50 rpm increments) until full seeds start to carry over. (This is usually the air speed that is capable of suspending seed over the chaffer until it exits).
- Increase feedrate in steps and keep monitoring loss over the chaffer.
- As loading increases, air speed decreases slightly, so the maximum acceptable blown-over seeds at low speed is usually less at normal harvesting rates.
- This setting technique is based on chaff fluidization (air moving through the entire chaff mat).
Proper adjustment of fan and sieves is important since canola seed can be easily blown out of the combine or remain mixed with the chaff and carried out. However, it is necessary to use enough wind to maintain a “live” sieve.
Two factors are important for a cleaning system to work effectively:
- The shoe must be fed evenly from side to side.
- The air must be distributed reasonably uniformly.
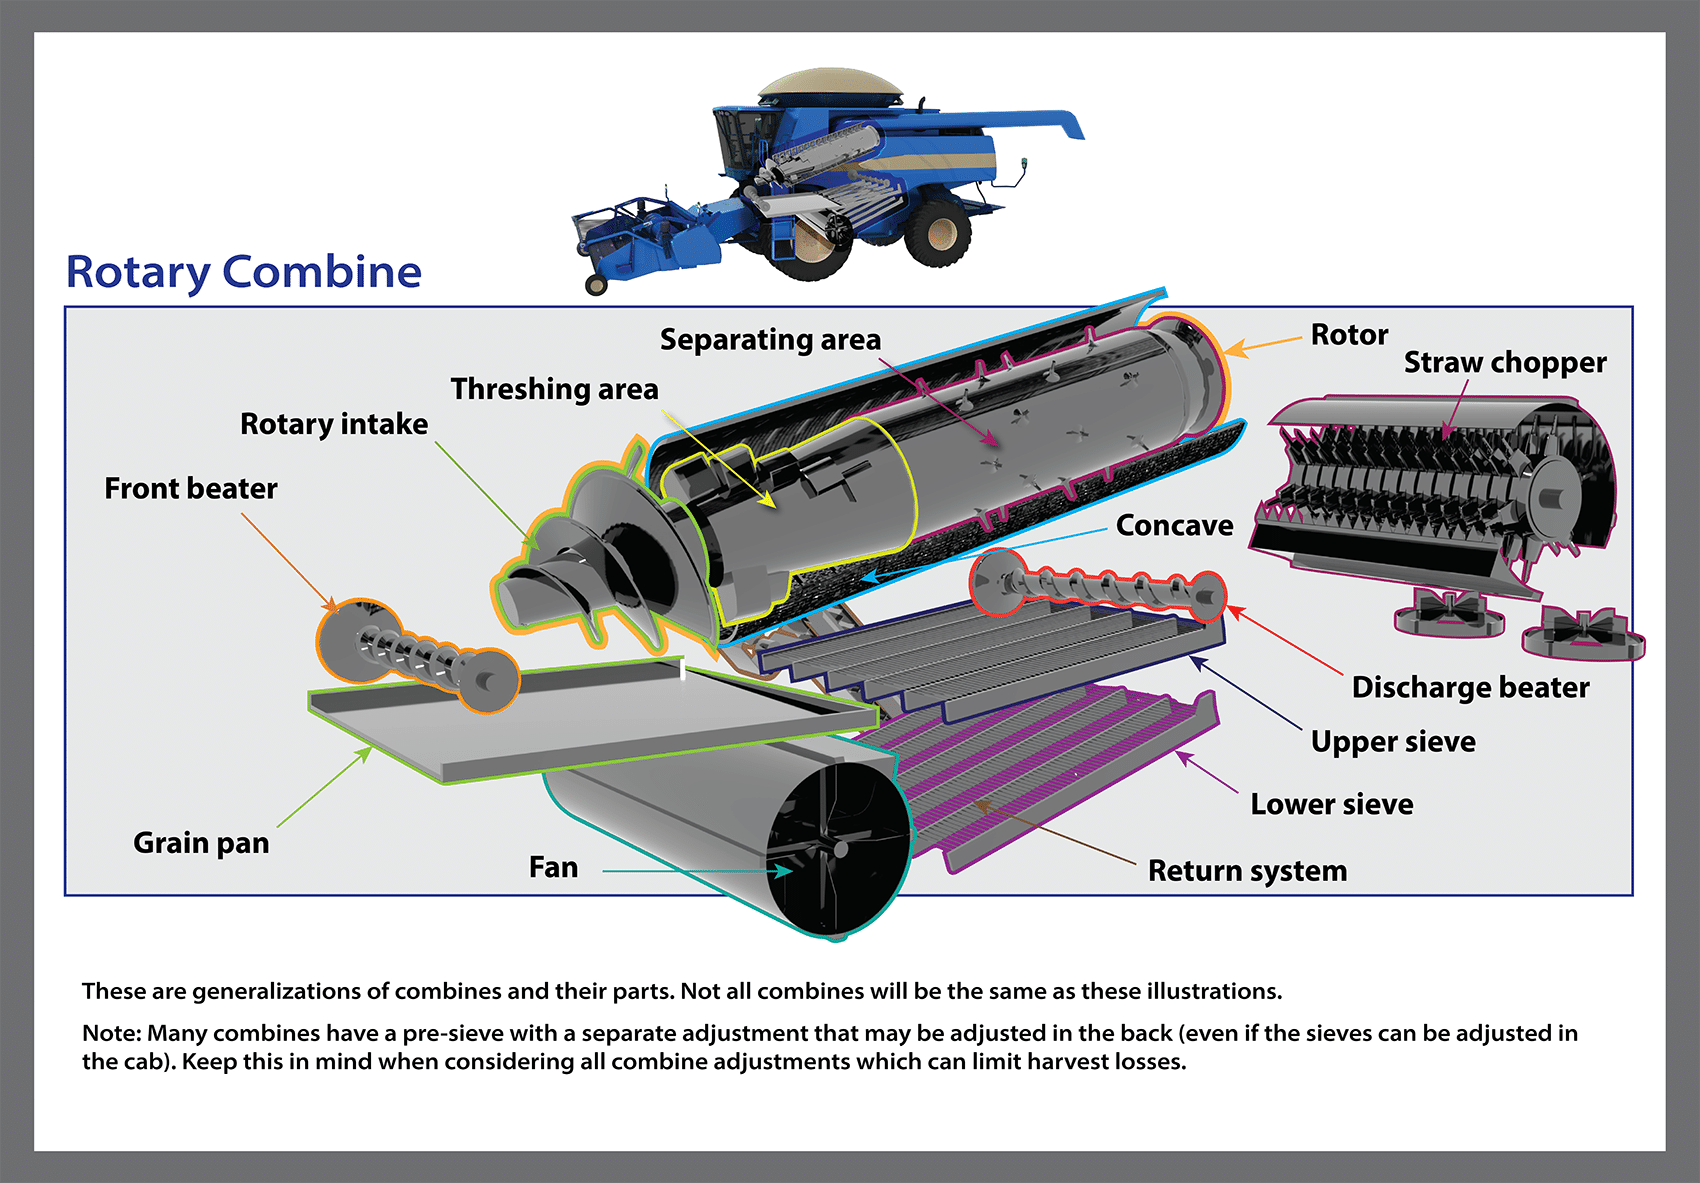
Uniform material delivery to the shoe is most affected by separation and this is most noticeable in rotary combines. There is a tendency for seed and chaff to load heavier on one side. Sometimes distribution can be improved by rotor speed and concave adjustment, but more often concave blanks or diverter panels are required to get more uniform distribution. Often the best way to check for distribution uniformity is to shut the combine down as quickly as possible while it is under load. This is called a “kill stall”. At the same time, the chaff distribution of the chaffer sieve needs to be checked. The front quarter of the chaffers should be chaff free. If longitudinal channels of the chaffer are blown clear or piled higher with material, it is important to verify if this corresponds to the material separated under the rotor. If they do not correspond it is likely that there is an uneven air distribution pattern. Typically, very little can be done to correct uneven air patterns, unless it is due to fan or fan inlet plugging. However, the distribution must be matched to the air pattern with more material directed to where the strongest air blast is.
There is a complex relationship between fan speed and sieve (pre-cleaner, chaffer, tailings and cleaning) openings. It is first important to recognize that it is much easier to blow air through seed and get to the chaff than it is to blow chaff through seed. This is why preparation floors shake the separated mixture to get the grain to the bottom before feeding onto the sieves. Pre-cleaners use a strong air blast to get chaff above the seed.
Generally closing the chaffer sieve directs air from a more vertical direction to a horizontal path. This causes seed and chaff to move rearward more quickly, reducing the time it is in the cleaning area. This also tends to align straws in the horizontal plane. When the chaff load is dry and light, fairly wide chaffer openings (15-22 millimetres or 9/16-7/8 of an inch) can provide maximum capacity as the material moves slower and has more time to separate. The chaff mat is also dispersed so that there is less restriction for the seed to fall through the mat. However, when chaff has larger pieces of stem or becomes damp or green, too wide of an opening can result in stems and pod pieces in the sample or stems “spearing” in the sieves. In some conditions, a wide chaffer sieve setting can result in an overloaded tailings system. In these instances, the chaffer must be closed more (12 millimetres or ½ of an inch).
Closing the cleaning sieve has a similar effect, but because it is below the chaffer sieve this also affects the air flow to the chaffer. In canola, the cleaning sieve is often closed to two to three millimetres (3/32-1/8 of an inch) but can also operate at times up to 6 millimetres (1/4 of an inch) open. Running a closed sieve can limit the air flow along the entire length of the chaffer sieve which means there is a chance in some machines that material will settle on the chaffer and ride out, taking seed with it.
Adjusting the lower sieve tight to obtain a very clean seed sample in the grain tank could send clean seed into the tailings return, which in turn may lead to extra seed damage.
If too much trash is in the grain tank and closing the sieve is not an option, try increasing the fan speed slightly or reducing the chaffer sieve opening. Often the tailings section at the rear of the chaffer sieve is opened wider than the main chaffer sieve. In canola this can be problematic. Unlike coarse grains, there are typically few unthreshedSeed that remains in the pod (ex. for canola) or head (for cereal) after a cycle through the combine. More pods to be caught. Opening the tailings section often overloads the tailings system with trash that should have been carried over the tailings section. The wide tailings section also provides an easy escape for air between the chaffer and cleaning sieve, which further reduces the air flow up through the chaffer sieve towards the rear of the chaffer.
If you can’t achieve acceptable shoe settings it is possible that you can go back and readjust your threshing and separating components. Sometimes this means more aggressive threshing to get rid of pieces of stem that can be broken to a size that the air can deal with, or it may mean decreasing the threshing aggressiveness so that the larger pieces stay in the separator and the chaff load is lighter.
Minimizing grain loss during harvest
The 2019 ‘On-farm survey of combine grain loss in canola across Western Canada‘ survey reported an average combine loss of 1.3 bushels per acre, or 2.8 per cent of yield. In this scenario, if canola is being sold at a price of $10.00 per bushel, combine losses would result in a revenue reduction of $13.00 per acre.
A loss of one kilogram/hectare (0.02 bushels per acre) is equal to 23 seeds of B. napusAlso referred to as Argentine canola, it is the species of canola currently commonly grown in Canada. More and 42 seeds of B. rapaAlso referred to as Polish canola, it is the less commonly grown species of canola currently grown in Canada. More per square metre remaining in the field. Average harvesting losses in the field can range from 10 to 50 kilogram/hectare (0.2 to 1 bushels per acre), but losses can reach 250 kilogram/hectare (five bushels per acre) or more in extreme conditions.
There are many benefits to reducing harvest losses:
Increased margin– Loss can be measured in several ways including operating costs, time, and revenue. For many farmers, the actual value will be a combination of these measurements. The last bushels in the grain tank are also more valuable from a margin perspective. If you subtract the number of bushels of yield needed to cover production expenses, there may be only a few bushels for margin. At this level, every bushel lost becomes a much higher percent of the profit compared to total yield. Instead of two to three per cent, it might be 20 to 50 per cent or more.
Reduced operating cost– From an operating cost comparison, slowing down combine travel speed to reduce grain loss can improve net revenue per acre, as the scenarios below exemplify.
- Scenario one: Combine at $300 per hour. Harvesting at four mph will take 12.5 hours for 160 acres. Cost of operating is 12.5 hours x 300 per hour = $3,750
- Scenario two: Combine at $300 per hour. Harvesting at 3.5 mph will take 14.5 hours for 160 acres. Cost of operating is 14.5 hours x 300 per hour = $4,350.
If one bushel per acre additional yield was captured because of slower harvest speed, one bushel at $10.50 per bushel x 160 acres = $1,680.
Scenario one cost of operating is $3,750+$1,680= $5,430. Scenario two cost of operating is $4,350, $1,080 less than scenario one.
Integrated weed management– An average yield loss of one bushel per acre can return 1200 seeds per square metre back to the soils. These seeds can volunteer the following year, putting large pre-seed and in-crop weed pressure on the subsequent crop. Reducing combine losses means lower weed competition.
Canola producers can lose up to five bushels or more per acre if the combine isn’t adjusted properly. The amount of loss that is acceptable is up to each farm manager. However, the amount of loss a combine produces depends on combine adjustments and how it is operated.
Measuring actual losses
A combine grain loss monitor that is suitably adjusted can be effective for monitoring loss in canola. The loss monitor can warn of changes in the grain loss rate, but does not accurately measure the amount of loss.
Step 1. Measure losses
Electronic loss monitors will not accurately measure losses out the back of the combine. They give you an indication whether losses are going up, but won’t tell you how many bushels per acre are thrown over. An increase in the meter reading is a signal to reduce the feedrate by slowing down. A reduction in the meter reading is a signal that the feedrate may be increased in order to improve productivity. Changes in crop conditions often occur during the day. The loss monitor will indicate when combine adjustments are necessary to compensate for changing weather conditions.

Measuring actual loss out the back of the combine requires a drop pan. There are three drop pan options:
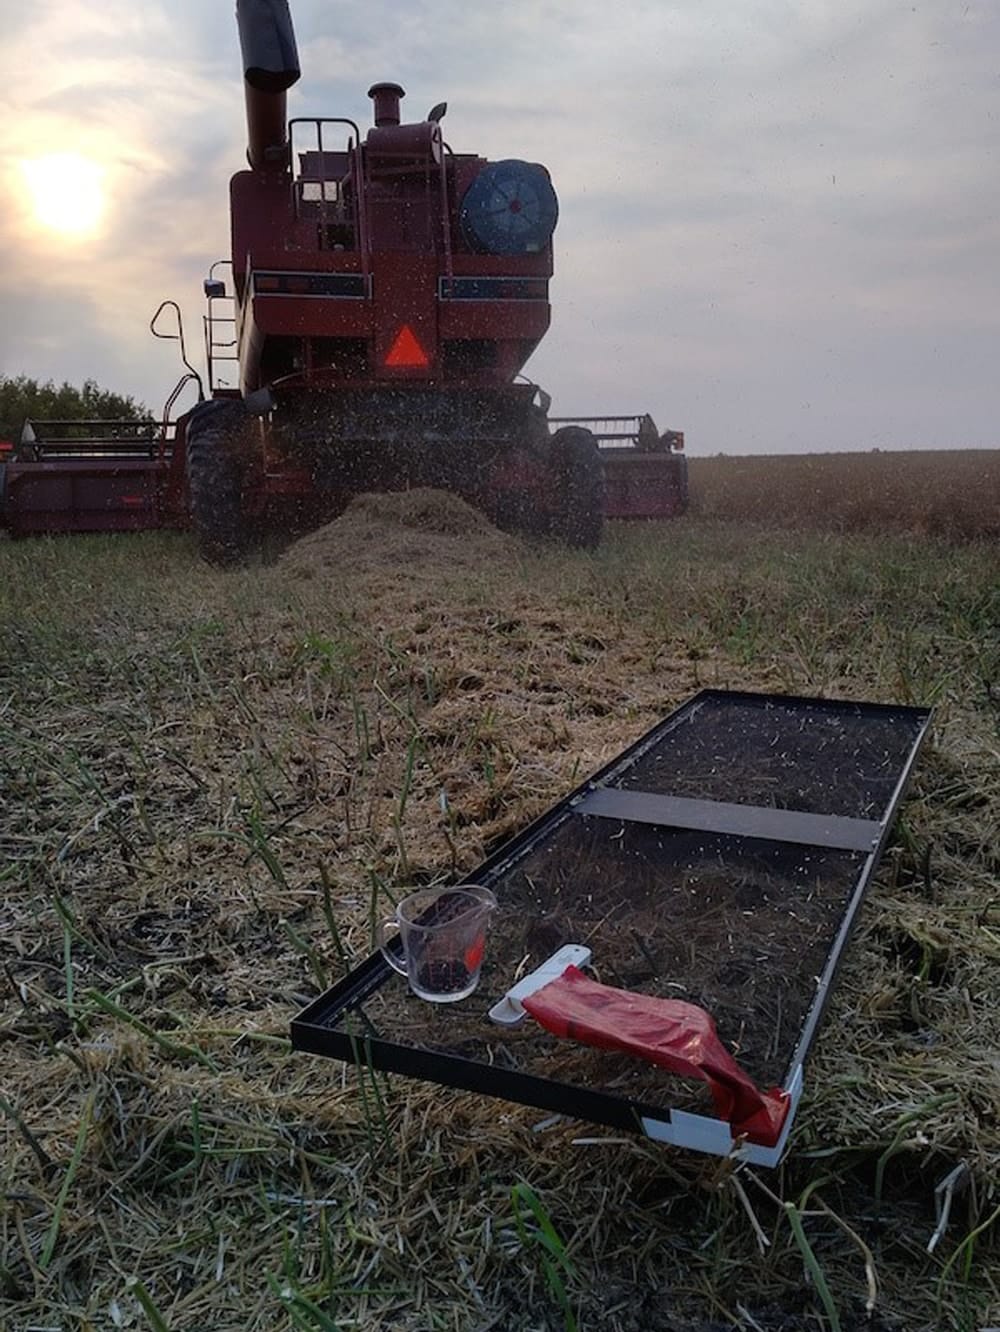
- Hands-free drop pan: The safest and most convenient method for measuring losses is a pan that attaches to the belly of the combine and can be released from the cab of the combine. Some function mechanically, by pulling string or levers to detach, while others can be attached via electromagnets, which release the pan once demagnetized.
- Stick pan: Make a stick pan with deep sides that you can hold under the back end of the combine as it goes by. Deep sides will limit seeds from bouncing out of the pan.
- Throw pan: Throw a pan under the combine. You can throw it ahead of the rear wheels to capture losses as the combine passes over it. There are obvious safety risks with this method. Extreme care and caution must be taken.
Take a sample
Once the collection tool is chosen, here are the simple sampling steps:
- Disengage the chaff spreader and straw chopper and move them out of the way. As a result, all straw and chaff drop straight down into the pan. This is important for calculations. Also, with the spreader off, the person holding the pan isn’t pelted with straw and seeds and dust.
Drop the pan, throw the pan, or hold the pan. When using the stick pan, the idea is to move the pan into position upside down so it doesn’t gather any losses ahead of time. To position the pan, walk behind and to the side of the rear wheels and extend the pan so it’s in front of the chaff and straw discharge area. Once the pan is in position, quickly flip it over and stop walking. Stand still until the combine has passed over the pan. With this procedure, you get the same result as though you’ve dropped or thrown the pan on the ground, but the handle gives you far more precision when it comes to placement. A long handle helps keep you out of the dust.
Note that the old method of walking alongside the combine using a scoop shovel is flawed in two ways. First, lightweight seeds such as canola will bounce off the shovel or roll out, so the sample is not a true representation. Second, timing becomes a factor when walking while sampling. For example, if a sample was taken for four seconds and then an adjustment was made to the combine settings and then another sample was taken where the shovel was held in place for three seconds, it wouldn’t be a fair comparison.
- Remove the straw and chaff and preserve only the seed. A screen or sieve will work well. Another method is to put the collected sample in the bottom of a deep five-gallon (20-litre) pail and stick a blower or old hairdryer into the pail. Chaff and straw will blow out and leave the seed behind.
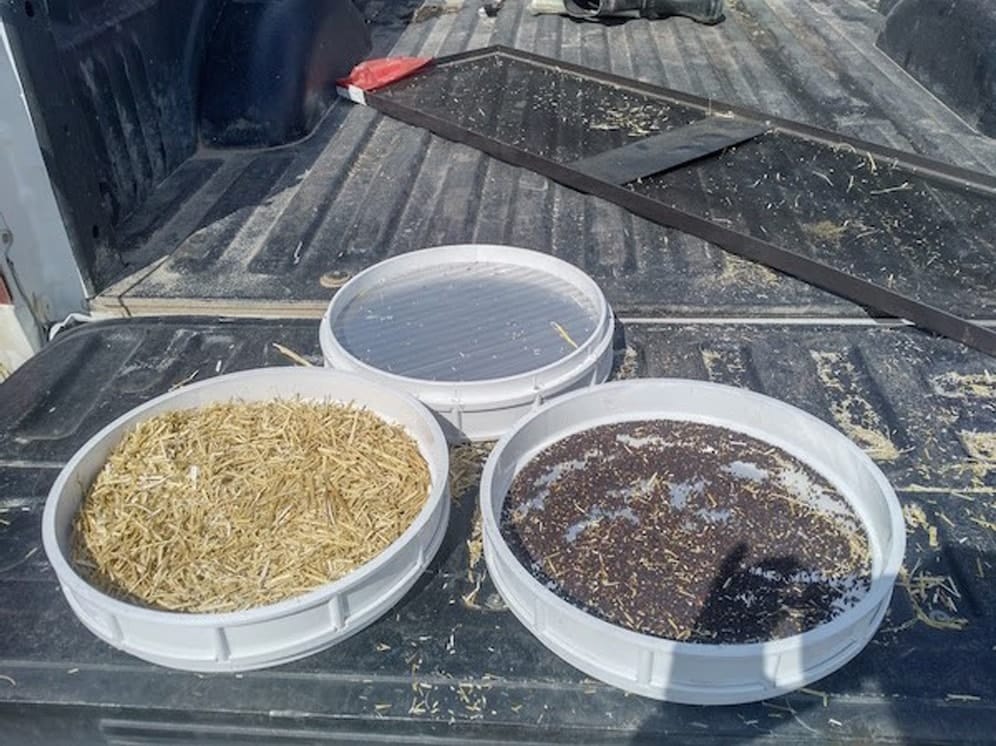
Calculate loss per acre with the harvest loss tool or the steps below:
- Measure the seed in the pan by weight (grams) or volume (millilitres). Alternatively, you can use the Combine Seed Loss Guide.
- Calculate based on one square foot. If your pan is two square feet, for example, divide the collection by two to get the total for one square foot.
- Determine the concentration factor (CF) for your combine. This is a ratio of swather or straight cut header width and combine discharge width. For example, if the header is 30 feet and the discharge width is five feet, then the CF is six. Use table one in the Combine Seed Loss Guide to calculate CF.
- Put these numbers into the appropriate table in the Combine Seed Loss Guide to get losses in pounds per acre. For example, if the cleaned sample amounts to 6.2 grams per square foot and the combine CF is six, this converts to a loss of 100 pounds per acre — or two bushels per acre.
- Take another sample before moving on to steps 2.
Step 2: Determine whether those losses are acceptable
While not as accurate, a visual assessment can provide a quick verification of combine loss. Then determine whether those losses are acceptable.
Combines running efficiently will lose some grain. If your target is zero losses, you’ll probably end up running too slow to get the job done in a timely fashion, risking natural losses and cost increases that will outweigh any reduction in grain loss.
An acceptable loss rate strikes a balance between productivity, saving grain, and a clean sample. For some, one per cent is worth striving for. For others, three per cent might be best if the harvest season is tight and it means they can keep the feedrate up and harvest an extra quarter section per week per machine.
Note that straw conditions can sometimes be the limiting factor when it comes to threshing losses. If setting changes and speed changes do not significantly change the degree of threshing losses, the only answer may be waiting for more drydown. The risk of waiting needs to be weighed against the potential for reduced losses.
Step 3: Making proper adjustments
The general tip if losses are too high, is to check the combine operators’ manual and look at the range of settings for canola (and consider if the current settings are within those ranges). If they aren’t, try changing that first. Try changing only one variable at a time and check losses between each adjustment. It is also worth checking that the automatic settings are calibrated. For example, if the chaffer setting on the monitor says 18 millimetres, take a ruler and check that the chaffer spacing is in fact 18 millimetres.
When considering adjustments, here are a few specific situations and possible solutions:
- If unthreshedSeed that remains in the pod (ex. for canola) or head (for cereal) after a cycle through the combine. More pods are found in the chaff, the combine is underthreshingA situation where the threshing components of the combine are not set aggressively enough to remove the seeds from the pod (for canola) or head (for cereals). More. Increase cylinder or rotor speed, narrow the concave setting, add concave blanks, or slow down.
- Losses can also result from underthreshingA situation where the threshing components of the combine are not set aggressively enough to remove the seeds from the pod (for canola) or head (for cereals). More, or going too slow. If straw is getting pulverized into small pieces that drop down to the sieves, thus reducing air flow and separation, this is usually a result of overthreshingA situation where the seed pod or head is threshed so aggressively in the combine that damage is caused to the seed. More. Cracked seed is another sign of overthreshingA situation where the seed pod or head is threshed so aggressively in the combine that damage is caused to the seed. More. Consider lowering the cylinder speed or widening the concave setting. This adjustment may also make it possible to drive faster and keep losses constant.
For timely information on various harvest management topics, check out Canola Watch’s Harvest Management section. Find additional articles on harvest management topics in Canola Digest issues.
Footnotes
- Watson, P., Brandt, S., Clayton, G., Harker, N. 2008. Canola Harvest Management Study. CARP, Canola Council of Canada.[↩]
- Holzapfel, C. 2014. QUANTIFYING GENETIC DIFFERENCES IN SEED LOSSES DUE TO POD DROP AND POD SHATTERING IN CANOLA (CARP-SCDC 2011-20). Indian Head Agricultural Research Foundation. Retrieved from: https://iharf.ca/wp-content/uploads/2016/04/Varietal-Differences-in-Seed-Loss-Due-to-Pod-Drop-and-Pod-Shatter-in-Canola.pdf[↩]
- Irvine, B. & Lafond, G. P. 2010. Pushing canola instead of windrowing can be a viable alternative. Can. J. Plant Sci., 90, 145-152.[↩]
- Canola Production Centre, 2001. 2002 Summary.[↩][↩][↩]
- Gan, Y., Malhi, S. S., Brandt, S. A., & McDonald, C. L. 2008. Assessment of seed shattering resistance and yield loss in five oilseed crops. Can. J. Plant Sci., 88, 267-270.[↩]
- McGREGOR, D.J. 1992. Swathing canola stops seed filling. Research Letter. Agric. Can. Res. Sta., Saskatoon, Saskatchewan.[↩]
- Vera, C. L., Downey, R. K., Woods, S. M., Raney, J. P., McGregor, D. I., Elliott, R. H., & Johnson, E. N. 2007. Yield and quality of canola seed as affected by stage of maturity at swathing. Can. J. Plant Sci., 87, 13–26.[↩][↩]
- Cenkowski, S., Sokhansanj, S., & Sosulski, F.W. 1989. Effect of harvest date and swathing on moisture content and chlorophyll content of canola seed. Can. J. Plant Sci., 69, 925-928.[↩][↩]
- Sokhansanj, S. & Sosulski, F.W. 1989. The effect of drying temperature and chlorophyll content of canola seed. Can. Inst. Food Sci. Technol. J., 22, 383-386.[↩]
- McGregor, D.I. 1994. Relationship between chlorophyll clearing and moisture loss. p. 26. In An Overview of Canola Agronomic and Varietal Research 1990-1993. Canola Council of Canada, Winnipeg, Manitoba.[↩]
- Wright, E.B. 1994. The influence of an artificially induced fall frost on the seed quality of Westar canola. An Overview of Canola Agronomic and Varietal Research 1990-1993. Canola Council of Canada, Winnipeg, Manitoba. 19.[↩]
- Canola@Fact: Understanding the maturing canola seed and the impact of frost. Aug 2006. Condensed article by Murray Hartman, ARD.[↩]
- Green, B.R., Singh, S., Babic, I., Bladen, C., & Johnson-Flanagan, A.M. 1998. Relationship of chlorophyll, seed moisture and ABA levels in the maturing Brassica napusAlso referred to as Argentine canola, it is the species of canola currently commonly grown in Canada. More seed and effect of a mild freezing stress. Physiologia Plantarum, 104, 125-133.[↩][↩]
- Angadi, S., Cutforth, H., McConkey, B.G., & Gan, Y. 2003. Yield Adjustment by Canola Grown at Different Plant Populations under Semiarid Conditions. Crop Science, 43, 1358–1366. https://doi.org/10.2135/cropsci2003.1358.[↩]
- Darwent, A. L., Kirkland, K. J., Townley-Smith, L., Harker, K. N., & Cessna, A. J. 2000. Effect of preharvest applications of glyphosate on the drying, yield and quality of canola. Can. J. Plant Sci., 80, 433–439.[↩]
- Holzapfel, C., 2010. Evaluating the effectiveness of pod-sealants for reducing shattering losses in several varieties of direct-combined canola. CARP-SCDC 2009-10.[↩]
- Johnson, B.L., McKay, K.R., Henson, R.A., Eriksmoen, E.D. & Novak, L. 2005. Comparing Straight Harvest with an Anti-shattering Agent to Swathed Harvest of Canola and the Evaluation of Field Scale Straight Combining Compared to Swathed Canola.[↩]