1. Date. Record the date and also the time of day that each crop was seeded. Comparing seeding dates, and cross referencing that with soil temperature and moisture conditions, can help determine future decisions with regard to ideal time of seeding and management steps that could be taken to reduce risks for early seeding. Time of day can sort out field order, which can be useful to determine when an equipment problem first occurred.
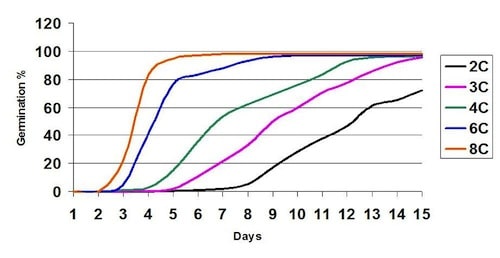
2. Soil temperature and moisture in the seedbed. Measure the soil temperature in the seed zone. Also note the 7- to 10-day temperature forecast and update your records with actual temperatures through that period. Soil temperatures in the days after seeding have a significant influence on the days to emergence and the uniformity of emergence. (See the graph below.) Recording soil temperature can help when sleuthing potential emergence issues, and can be a useful reference if emergence is very strong. Also note seedbed soil moisture — dry, moist or wet — on seeding day.
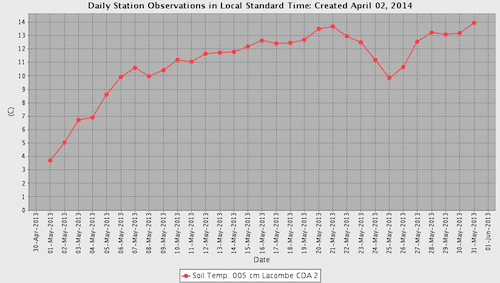
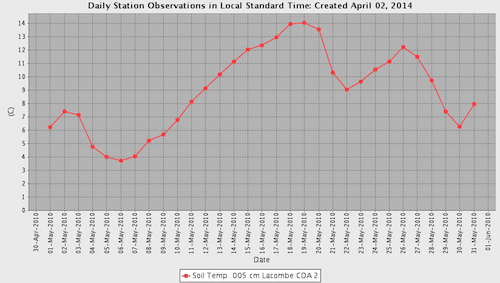
The two graphs at the top of the article show soil temperatures (5 cm depth) for Lacombe in 2013 and 2010. For the first three weeks of May 2013, weather was very warm with little rain, but some winter snow was still persisting at the beginning of May. Note how quickly temperatures increased so that by the end of the first week, soil temperatures were above 10 C, a good temperature for emergence. In 2010, soil temperatures declined after early May, so seeding early May could have adversely affected emergence. The graphs are from Alberta Agriculture’s website.

3. Seed variety and seed lot. Keep a record of seed lots and varieties, including thousand seed weight (TSW). Keep small samples of all lots. Put a minimum 500 ml (2 cups) from each seed lot into a seed lab bag. Record seeding date and rate, and keep the blue seed tag.
4. Seed depth. It’s not the intended seed depth that matters, but the actual depth achieved. Get out of the tractor a few times per field and check depth from row to row. Check an area that represents seed placement when the drill is going full speed, so start at least 100 feet behind where the drill stopped, or check the previous pass. Adjust the drill as necessary to achieve a consistent depth of 1/2” to 1” across the width of the drill. Inconsistent seed depth leads to highly variable emergence dates, uniformity and seed survival from row to row.
5. Seeding rate. Record lb./ac. rate but also and, more importantly, calculate the number of seeds per square foot. By recording seeding rate in seeds per square foot, it will be easier to assess survival rates when checking the stand three weeks after seeding. If the rate was 10 seeds per square foot, and 5 seedlings emerge, then the survival rate was 50%. How to increase seed survival rates.
6. Seeding speed. Good recordkeeping will help growers determine the ideal seeding speed for their drill and their soil conditions. When checking for emergence patterns, if some rows are clearly delayed while others emerged quickly and evenly, go back and check the seeding speed. Excess seeding speed can cause rear openers to throw soil over front rows, leading to uneven seed depth row to row.
7. Surface residue. Describe the crop residue situation. Is it clumpy, well spread out, chopped up well, thin, thick? Poor distribution of residue or overly thick residue can lead to poor seed placement and uneven emergence. If residue hampers emergence, use these seeding records as a reminder to adjust residue management in the fall. Solid manure applied in fall or spring and unincorporated can also reduce seedbed quality.
8. Fertilizer 4Rs. Record fertilizer rates, timing, placement and product. This is useful information for many aspects of future crop nutrient management. It is especially important to note the rate and product for all fertilizer placed in the seed row when diagnosing possible emergence issues later. More on the 4Rs.
9. Fills. Record the specific location of each seed and fertilizer fill using GPS reference, as well as weather conditions and any product changes for each fill. This could provide useful information if plant performance suddenly changes at that spot.
10. Weed management. Record whether the field got a pre-seed herbicide, and the product along with application rate and date. Record the target weeds and their size. Then, at the time of seeding, record the location and weeds present for patches that may have been missed pre-seed. Document the level of weed regrowth since the pre-seed burn. This information can be used to determine the urgency of an in-crop spray or post-seeding/pre-emergence spray, and the need for potential tank mixes or spot applications to get specific weeds and patches.


